# Flex247 Documentation — Complete AI Corpus
> Canonical machine-readable export of the public Flex247 documentation. No authentication or JavaScript is required.
Index: https://ai-apidocs.noflex.work/llms.txt
Human docs: https://ai-apidocs.noflex.work/
API base URL: https://api.noflex.work/v1
# Language: English (en)
---
## Document: Anthropic Protocol
Source: https://ai-apidocs.noflex.work/en/anthropic-compatible
> Human-readable source: [https://ai-apidocs.noflex.work/en/anthropic-compatible](https://ai-apidocs.noflex.work/en/anthropic-compatible)
# Anthropic Protocol
Use this protocol with Claude Code, Anthropic SDKs and Messages API clients.
Base URLhttps://api.noflex.work
## cURL
```bash
curl https://api.noflex.work/v1/messages \
-H "x-api-key: sk-your-flex247-key" \
-H "anthropic-version: 2023-06-01" \
-H "content-type: application/json" \
-d '{
"model": "your-claude-model-id",
"max_tokens": 512,
"messages": [{"role": "user", "content": "Return only OK"}]
}'
```
## JavaScript / TypeScript
```bash
npm install @anthropic-ai/sdk
```
```js
import Anthropic from '@anthropic-ai/sdk'
const client = new Anthropic({
apiKey: process.env.FLEX247_API_KEY,
baseURL: 'https://api.noflex.work'
})
const message = await client.messages.create({
model: 'your-claude-model-id',
max_tokens: 512,
messages: [{ role: 'user', content: 'Review this API design.' }]
})
console.log(message.content[0].text)
```
## Python
```bash
pip install anthropic
```
```python
import os
from anthropic import Anthropic
client = Anthropic(
api_key=os.environ["FLEX247_API_KEY"],
base_url="https://api.noflex.work",
)
message = client.messages.create(
model="your-claude-model-id",
max_tokens=512,
messages=[{"role": "user", "content": "Summarize this change."}],
)
print(message.content[0].text)
```
## Common configuration mistakes
- Avoid a duplicated `/v1/v1` in `ANTHROPIC_BASE_URL`.
- Use the complete model ID shown in Flex247 Model Square.
- Remove whitespace around `x-api-key` or `ANTHROPIC_AUTH_TOKEN`.
- If the client supports only OpenAI-style requests, use [OpenAI Compatible](./openai-compatible).
---
## Document: Text & Code Requests
Source: https://ai-apidocs.noflex.work/en/api-examples
> Human-readable source: [https://ai-apidocs.noflex.work/en/api-examples](https://ai-apidocs.noflex.work/en/api-examples)
# Text & Code Requests
These examples use the Flex247 OpenAI Compatible endpoint.
## Basic chat
```bash
curl https://api.noflex.work/v1/chat/completions \
-H "Authorization: Bearer sk-your-flex247-key" \
-H "Content-Type: application/json" \
-d '{
"model": "your-model-id",
"messages": [{"role":"user","content":"Write one product tagline."}]
}'
```
## System instructions
```json
{
"model": "your-model-id",
"messages": [
{"role": "system", "content": "Act as a senior code reviewer. State risks first, then propose the smallest safe change."},
{"role": "user", "content": "Review the following function."}
]
}
```
## Multi-turn chat
Include the history you want the model to retain:
```js
const messages = [
{ role: 'user', content: 'Suggest three project names.' },
{ role: 'assistant', content: 'Nova, Orbit, Canvas' },
{ role: 'user', content: 'Choose the second and write a tagline.' }
]
const result = await client.chat.completions.create({
model: 'your-model-id',
messages
})
```
## JSON output
For models supporting structured output, request JSON and still validate the schema in production:
```json
{
"model": "your-model-id",
"messages": [
{"role":"user","content":"Return JSON with title, summary and tags."}
],
"response_format": {"type":"json_object"}
}
```
## Timeouts and retries
- Retry timeouts, interrupted connections and selected `5xx` errors only a limited number of times.
- Do not repeatedly retry `401`; verify the key first.
- Use exponential backoff for `429` and reduce concurrency.
- Stream long tasks when supported.
---
## Document: Account & API Keys
Source: https://ai-apidocs.noflex.work/en/api-keys
> Human-readable source: [https://ai-apidocs.noflex.work/en/api-keys](https://ai-apidocs.noflex.work/en/api-keys)
# Account & API Keys
An API key represents access to your account. Give each application its own key to make usage tracking, rotation and incident response easier.
## Create a key
1. [Sign in to Flex247](https://noflex.work/sign-in).
2. Open **API Keys**.
3. Choose a descriptive name such as `MacBook-Codex` or `Production-Store`.
4. Set the group, model restrictions and quota when required.
5. Create the key and store the complete value immediately.
## Authentication headers
OpenAI Compatible requests use a Bearer token:
```http
Authorization: Bearer sk-your-flex247-key
```
Anthropic Protocol requests can use:
```http
x-api-key: sk-your-flex247-key
```
## Recommended practices
- Use different keys for development, staging and production.
- Never embed keys in browser code, mobile apps or public repositories.
- Load keys through environment variables or a server-side secret manager.
- Disable a suspicious key before creating its replacement.
- Review **Usage Logs** to verify models, token usage and charges.
## Rotate a key without downtime
1. Create a replacement key.
2. Update the application.
3. Send a test request and check its usage log.
4. Disable the old key only after its traffic has stopped.
## Teams and devices
Avoid sharing one key across people or services. Per-user and per-service keys make ownership and troubleshooting clear.
---
## Document: IDEs & Chat Clients
Source: https://ai-apidocs.noflex.work/en/apps-and-ides
> Human-readable source: [https://ai-apidocs.noflex.work/en/apps-and-ides](https://ai-apidocs.noflex.work/en/apps-and-ides)
# IDEs & Chat Clients
Most clients that support custom providers can connect with the same Flex247 parameters.
## Generic OpenAI Compatible template
| Field | Value |
| --- | --- |
| Provider / Type | OpenAI Compatible / Custom OpenAI |
| API Key | `sk-your-flex247-key` |
| Base URL | `https://api.noflex.work/v1` |
| Model | Exact model ID from Model Square |
This pattern works with OpenAI-style custom providers in clients such as Cline, Roo Code, Kilo Code and Cherry Studio.
## Generic Anthropic template
| Field | Value |
| --- | --- |
| Provider / Type | Anthropic / Custom Anthropic |
| API Key | `sk-your-flex247-key` |
| Base URL | `https://api.noflex.work` |
| Model | Anthropic-compatible model ID |
## Setup flow
1. Open the client’s Provider, Models or API settings.
2. Choose a custom provider.
3. Enter the Base URL required by the protocol.
4. Paste the Flex247 API key.
5. Enter the model ID or refresh the model list.
6. Save and send a short test message.
## Common causes of failure
- `/v1` is missing or duplicated.
- The model ID differs from Model Square.
- The key group does not have a route for that model.
- The client is locked to one protocol but the other provider type was selected.
- The client cached the old configuration and needs a full restart.
---
## Document: Connect CC Switch to Flex AI
Source: https://ai-apidocs.noflex.work/en/cc-switch
> Human-readable source: [https://ai-apidocs.noflex.work/en/cc-switch](https://ai-apidocs.noflex.work/en/cc-switch)
# Connect CC Switch to Flex AI
CC Switch is a third-party cross-platform desktop tool for managing providers across Claude Code, Codex, OpenCode and other apps. Its local routing service can also record requests, track usage and apply failover.
- [Only official website](https://ccswitch.io)
- [Official GitHub repository](https://github.com/farion1231/cc-switch)
- [Official downloads](https://github.com/farion1231/cc-switch/releases)
::: warning Download only from official sources
The CC Switch documentation recommends using only `ccswitch.io`, GitHub Releases or the source repository. Never give an API key or login credential to an unofficial installer.
:::
## 1. Install
- Windows: download `Windows.msi`, or use the `Windows-Portable.zip` build.
- macOS: download the `.dmg`, or run `brew install --cask cc-switch`.
- Linux: select the `.deb`, `.rpm` or `.AppImage` package.
Make sure Codex is installed and has been started at least once.
## 2. Add the Flex247 provider
1. Select **Codex** at the top of CC Switch.
2. Click **+** in the upper-right corner.
3. Choose **App-specific provider**, then **Custom**.
4. Enter these values.
| Field | Value |
| --- | --- |
| Name | `Flex247` |
| API Endpoint / Base URL | `https://api.noflex.work/v1` |
| API Key | Your dedicated Flex247 key |
| Wire API / API format | **Responses** |
| Model | An exact Responses-compatible model ID from Model Square |
| Local route mapping required | Off; enable it only for a Chat Completions-only upstream |
After entering the key and endpoint, click **Get Models** beside the model field. CC Switch calls `/v1/models` and lets you choose a model directly.
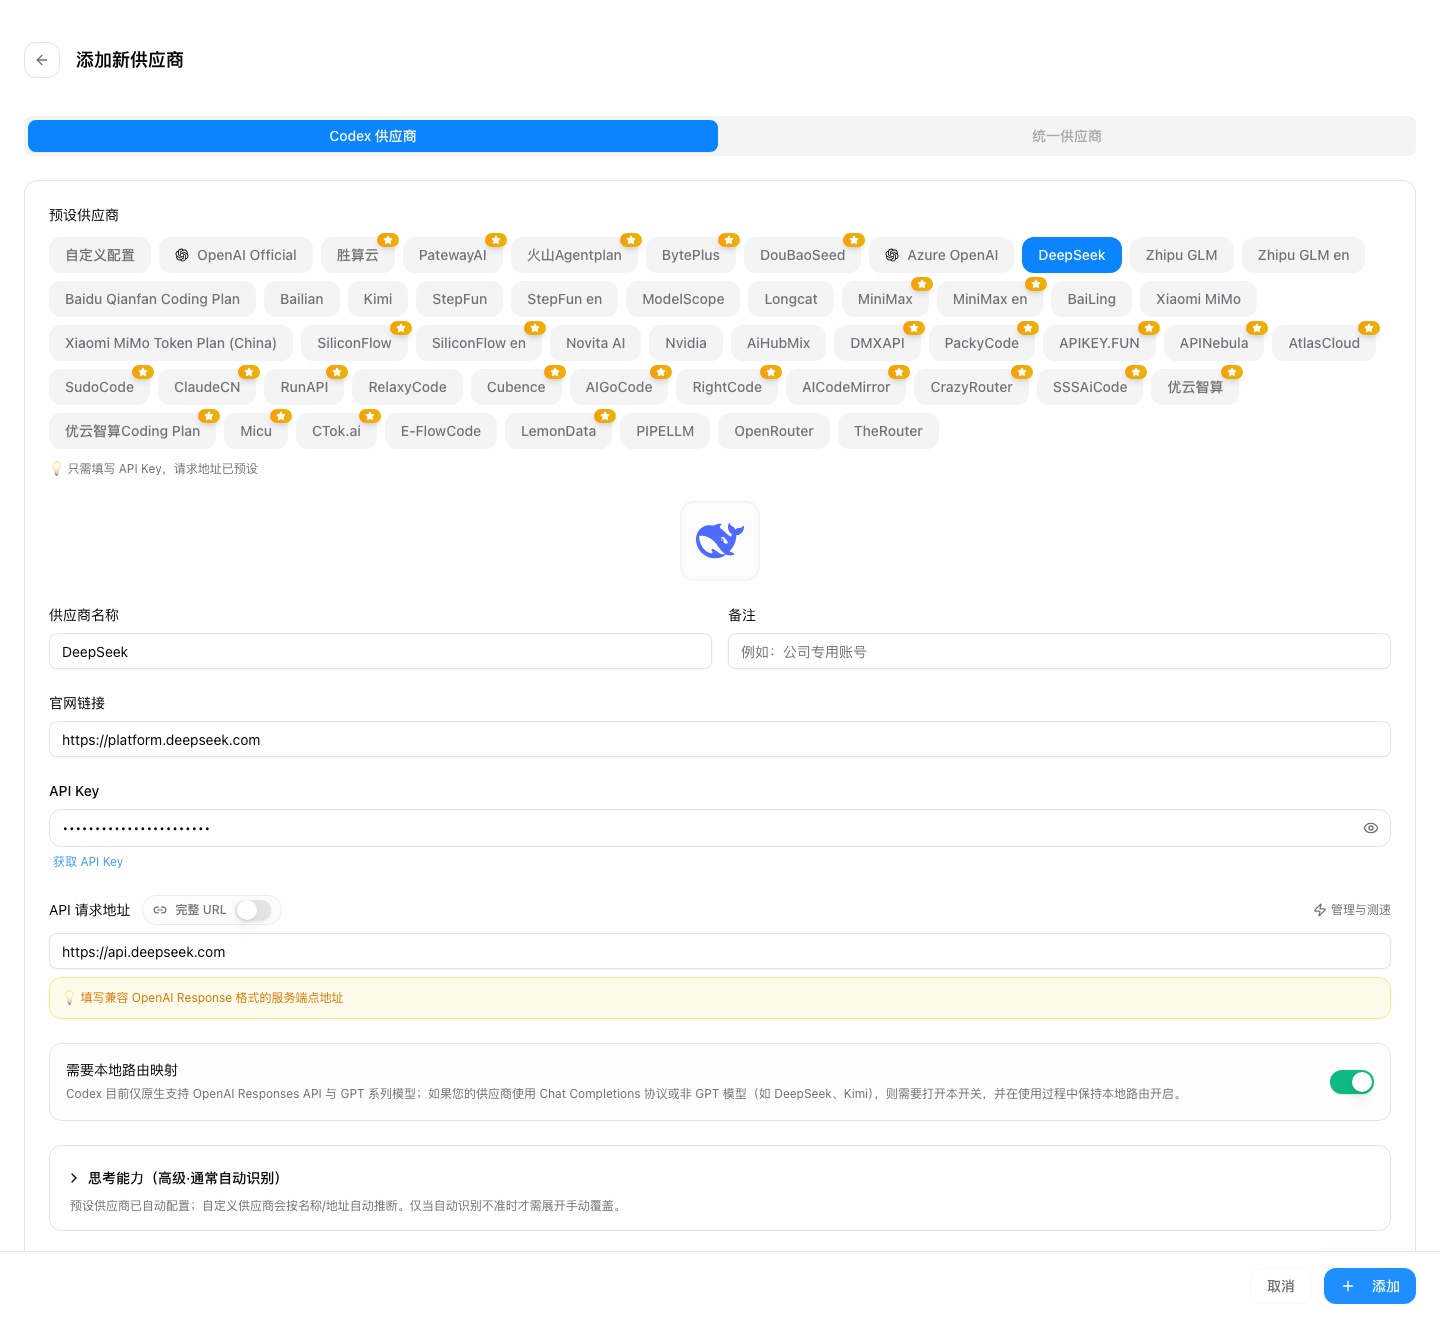
Figure 1: Official CC Switch Codex-provider form example. The name, endpoint and models shown in this Chinese-language screenshot are sample values; replace them with the Flex247 values in the table above. Image from the project repository.
Start with `gpt-5.6-luna`, or select another Responses-compatible model from [Model Square](https://noflex.work/pricing).
## 3. Save and switch
1. Save the provider.
2. Select `Flex247` on the main screen and click **Enable**.
3. Restart Codex or open a new terminal.
4. Send a read-only test request and confirm it in Flex247 **Usage Logs**.
If the custom screen asks for raw Codex configuration, use the following core values. Keep the API key in the CC Switch credential field rather than a public file.
```toml
model = "gpt-5.6-luna"
model_provider = "flex247"
[model_providers.flex247]
name = "Flex247"
base_url = "https://api.noflex.work/v1"
wire_api = "responses"
requires_openai_auth = true
```
## 4. Optional: enable local routing
For request logs, usage statistics or failover:
1. Open **Settings → Advanced → Routing Service**.
2. Start the routing service.
3. Enable **Codex Routing** under **App Routing**.
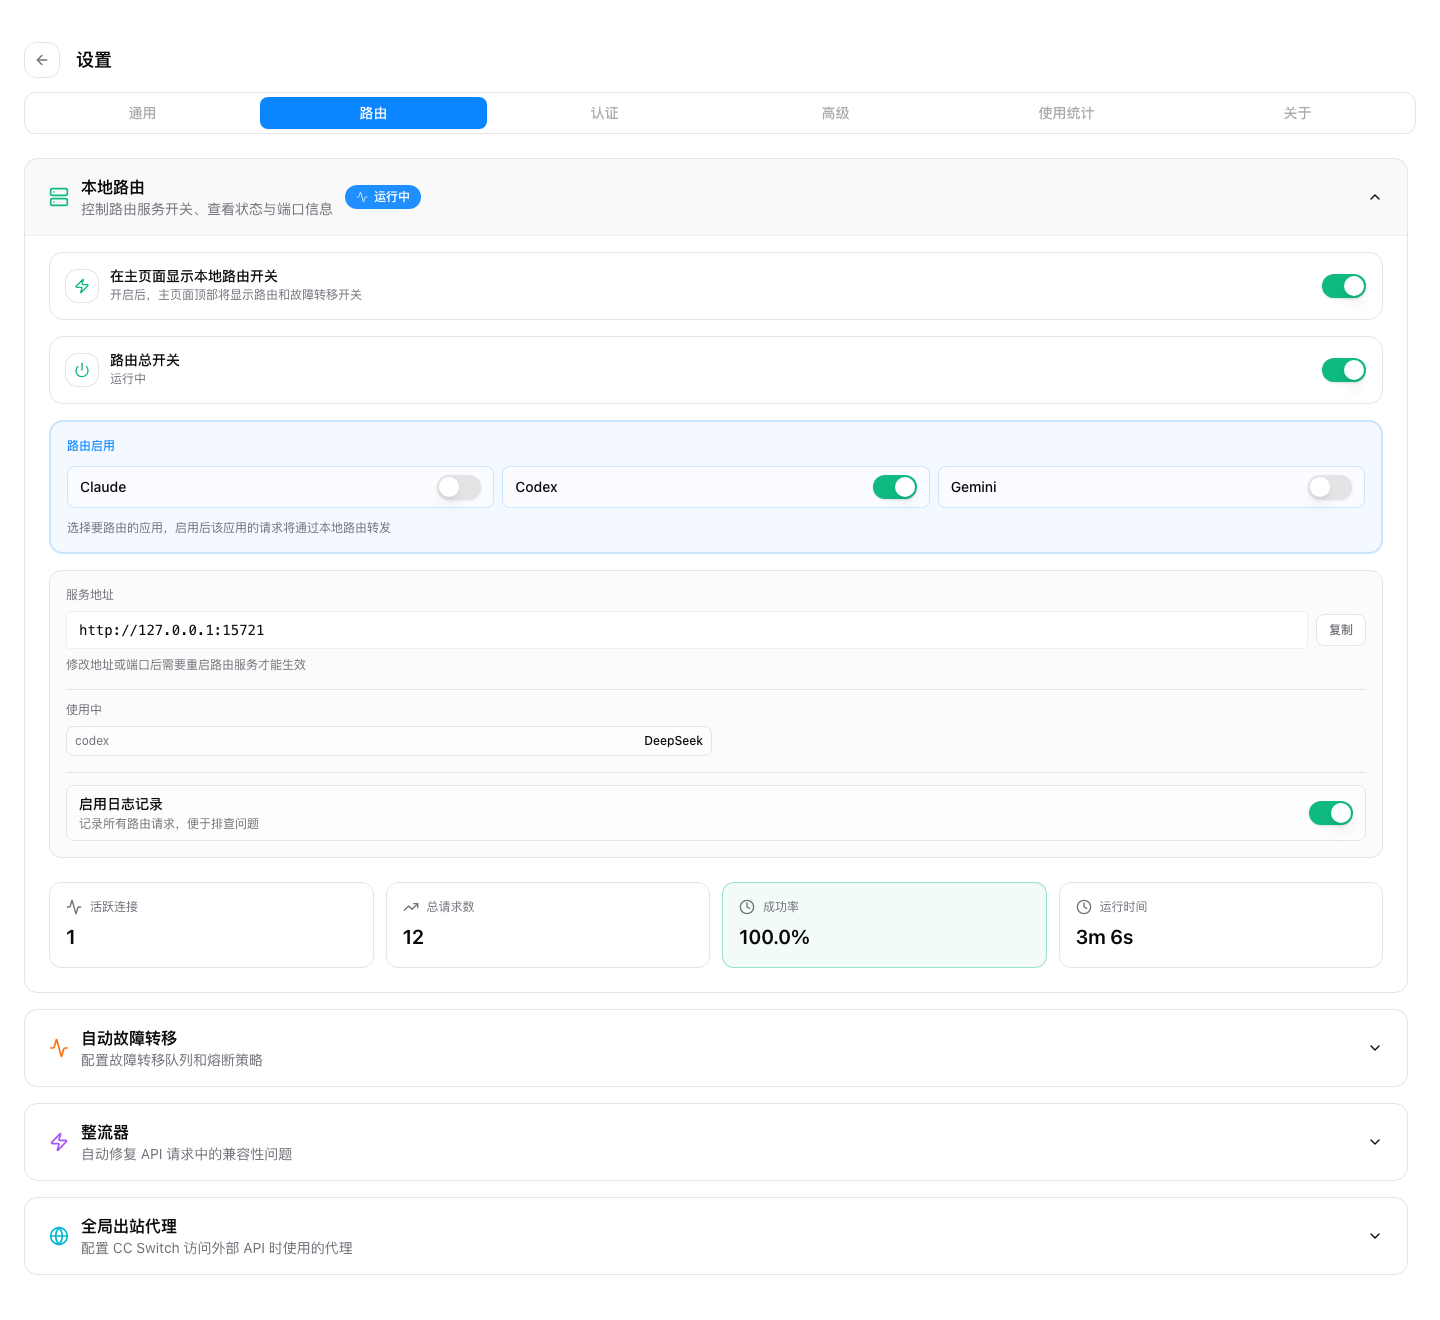
Codex then connects to the CC Switch local endpoint, normally `http://127.0.0.1:15721/v1`, and CC Switch forwards requests to Flex247. Do not use this local URL as the upstream Base URL of the Flex247 provider.
Figure 2: Codex local-routing interface from the official CC Switch documentation. After enabling it, use the local address shown by the app. Image from the project repository.
## Chat Completions models
For a model that supports only `/v1/chat/completions`:
1. Change the provider protocol to **Chat Completions**.
2. Enable **Local route mapping required**.
3. Configure the Codex model mapping and keep the routing service running.
Codex natively uses the Responses API, so a Chat Completions-only model requires local protocol conversion.
## Troubleshooting
### The model list does not load
Check the API key, Base URL and account balance. The Base URL must be `https://api.noflex.work/v1`.
### The switch does not take effect
Restart Codex and the terminal. Confirm that the active CC Switch app panel is **Codex**, not Claude Code or another app.
### Local routing is not running
Start the service in Advanced settings before enabling Codex routing, and check that port `15721` is free.
## Official references
- [Installation guide](https://github.com/farion1231/cc-switch/blob/main/docs/user-manual/en/1-getting-started/1.2-installation.md)
- [Add a provider](https://github.com/farion1231/cc-switch/blob/main/docs/user-manual/en/2-providers/2.1-add.md)
- [App routing](https://github.com/farion1231/cc-switch/blob/main/docs/user-manual/en/4-proxy/4.2-routing.md)
---
## Document: Claude Code
Source: https://ai-apidocs.noflex.work/en/claude-code
> Human-readable source: [https://ai-apidocs.noflex.work/en/claude-code](https://ai-apidocs.noflex.work/en/claude-code)
# Claude Code
Connect Claude Code to Flex247 through its Anthropic-compatible environment variables.
## 1. Install
### Windows PowerShell
```powershell
irm https://claude.ai/install.ps1 | iex
```
### macOS / Linux
```bash
curl -fsSL https://claude.ai/install.sh | bash
```
Verify the installation:
```bash
claude --version
claude doctor
```
## 2. Temporary configuration
### Windows PowerShell
```powershell
$env:ANTHROPIC_AUTH_TOKEN = "sk-your-flex247-key"
$env:ANTHROPIC_BASE_URL = "https://api.noflex.work"
$env:CLAUDE_CODE_DISABLE_NONESSENTIAL_TRAFFIC = "1"
claude
```
### macOS / Linux
```bash
export ANTHROPIC_AUTH_TOKEN="sk-your-flex247-key"
export ANTHROPIC_BASE_URL="https://api.noflex.work"
export CLAUDE_CODE_DISABLE_NONESSENTIAL_TRAFFIC="1"
claude
```
## 3. Persistent settings
Add the following to your Claude Code user settings:
```json
{
"env": {
"ANTHROPIC_AUTH_TOKEN": "sk-your-flex247-key",
"ANTHROPIC_BASE_URL": "https://api.noflex.work",
"CLAUDE_CODE_DISABLE_NONESSENTIAL_TRAFFIC": "1"
}
}
```
Close and reopen the terminal or editor after saving.
## 4. Verify
Run `claude`, then ask it to reply only with `Flex247 connected`. Confirm the request in Flex247 **Usage Logs**.
## VS Code and Cursor extensions
The extension uses the same environment variables. If the CLI works but the extension fails, fully exit the editor, reopen it and confirm that it reads the same user environment.
::: warning Permission safety
Do not enable unrestricted permission bypass by default. Adjust permission modes only for trusted projects or isolated environments.
:::
---
## Document: Connect CLIProxyAPI to Flex AI
Source: https://ai-apidocs.noflex.work/en/cliproxyapi
> Human-readable source: [https://ai-apidocs.noflex.work/en/cliproxyapi](https://ai-apidocs.noflex.work/en/cliproxyapi)
# Connect CLIProxyAPI to Flex AI
CLIProxyAPI is a popular open-source local proxy that exposes OpenAI, Responses, Claude and Gemini-compatible interfaces for Codex, Claude Code, Gemini and other clients. It is the additional high-star local API routing tool selected for this section.
- [Official GitHub repository](https://github.com/router-for-me/CLIProxyAPI)
- [Official Releases](https://github.com/router-for-me/CLIProxyAPI/releases)
- [Official guide](https://help.router-for.me/)
::: info Why it was selected
Among high-star local proxy projects that are close to CC Switch and Cockpit Tools and explicitly support coding CLIs, CLIProxyAPI is a popular option with custom OpenAI-compatible upstream support. Star counts change, so refer to the official repository for the current number.
:::
## Understand the two API keys
CLIProxyAPI uses two different types of keys:
| Key | Purpose |
| --- | --- |
| Flex247 upstream key | Used by CLIProxyAPI to call `https://api.noflex.work/v1` |
| Local client key | Used by Codex or another client to access CLIProxyAPI |
Use different values. Do not enter the local client key into Flex247, and do not expose the upstream Flex247 key directly to local clients.
## 1. Install
Download and extract the archive for your operating system from the official Releases page. On Windows, this is normally the `windows_amd64.zip` asset.
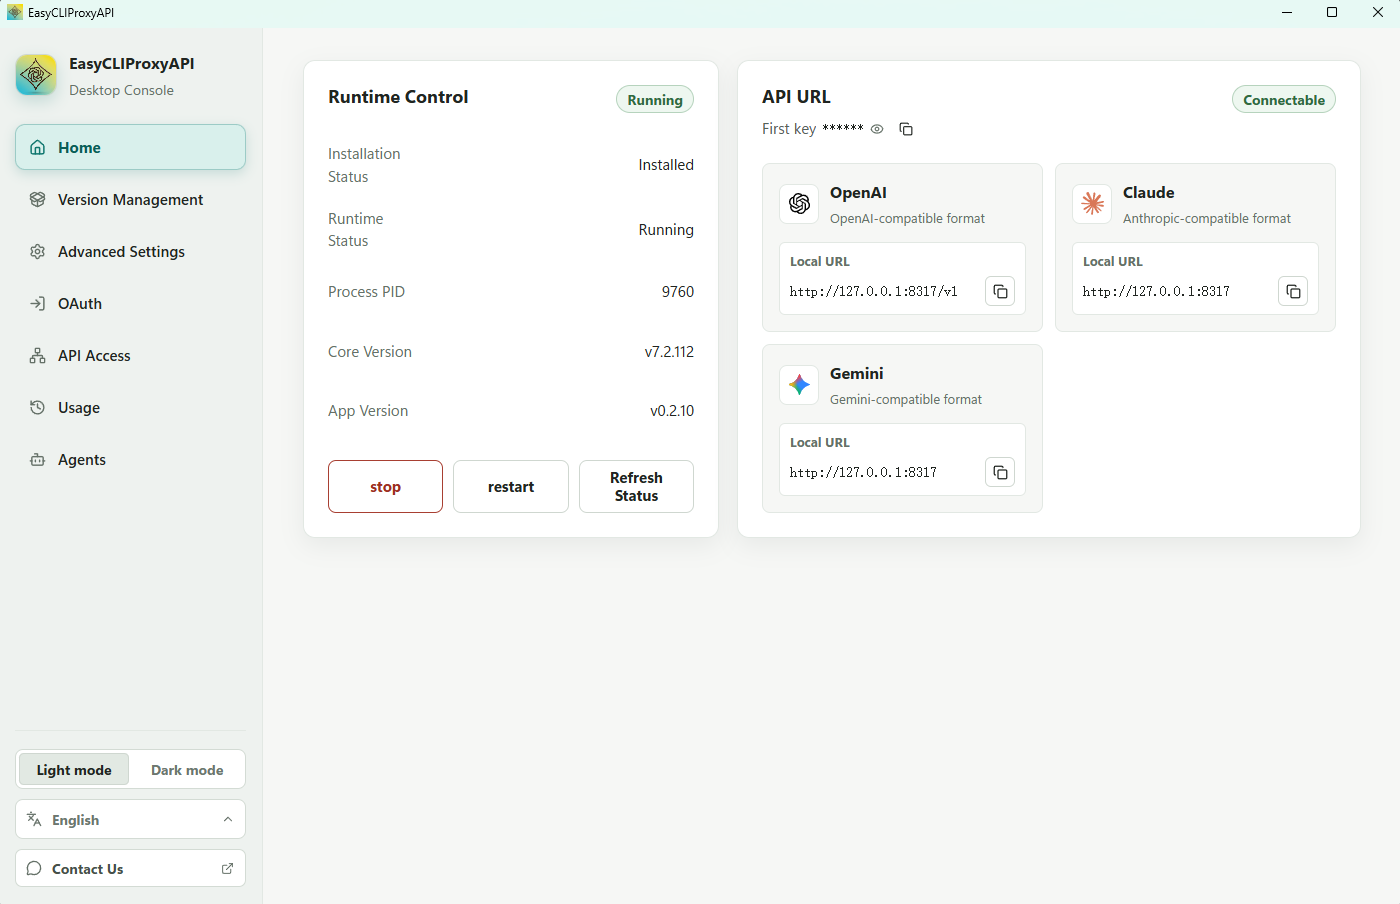
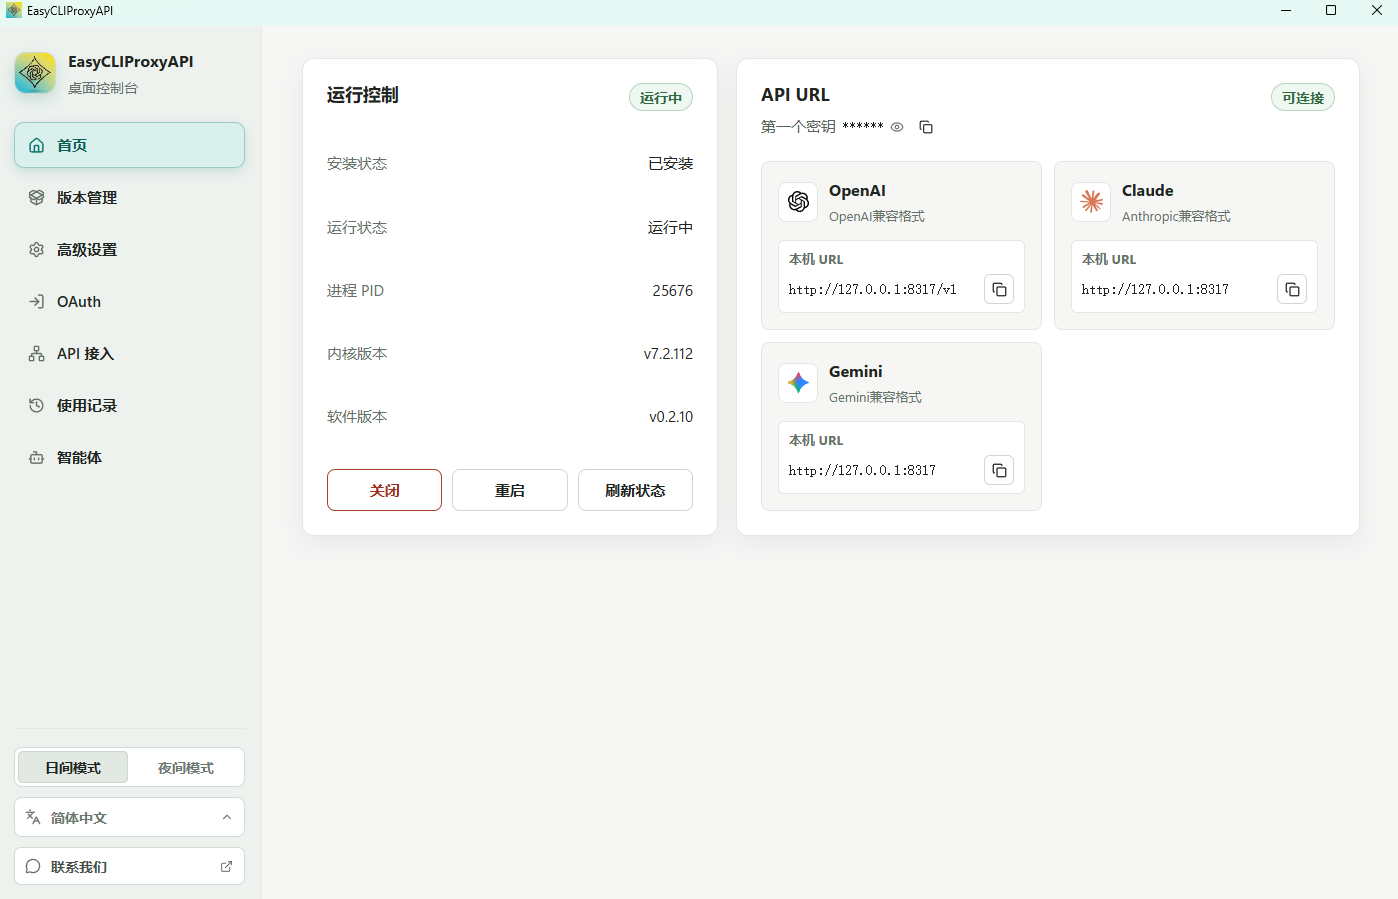
Desktop users may also use [EasyCLIProxyAPI](https://github.com/router-for-me/EasyCLIProxyAPI), which the project README recommends as a graphical manager. This guide uses the core CLIProxyAPI configuration so every routing value remains explicit.
Figure 1: EasyCLIProxyAPI, the desktop manager recommended by the CLIProxyAPI README, showing runtime status and local OpenAI, Claude and Gemini endpoints. Image from the project repository.
## 2. Create `config.yaml`
Copy the official `config.example.yaml` to `config.yaml`, then keep the required fields. This is a minimal, local-only Flex247 example:
```yaml
host: "127.0.0.1"
port: 8317
api-keys:
- "replace-with-a-long-random-local-client-key"
openai-compatibility:
- name: "flex247"
base-url: "https://api.noflex.work/v1"
api-key-entries:
- api-key: "sk-your-flex247-key"
models:
- name: "gpt-5.6-luna"
alias: "gpt-5.6-luna"
```
Add more exact IDs from [Model Square](https://noflex.work/pricing) under `models`:
```yaml
- name: "your-second-model-id"
alias: "your-second-model-id"
```
::: warning Keep it bound to localhost
An empty `host` in the official example listens on all interfaces. For a personal computer, explicitly use `127.0.0.1`. LAN access requires additional firewall rules, a strong random client key and proper access controls.
:::
## 3. Start and test
Start the service from the extracted directory.
### Windows PowerShell
```powershell
.\cli-proxy-api.exe -config config.yaml
```
### macOS / Linux
```bash
./cli-proxy-api -config config.yaml
```
Use the local client key to check the model list:
```powershell
curl.exe http://127.0.0.1:8317/v1/models `
-H "Authorization: Bearer replace-with-a-long-random-local-client-key"
```
The response should include the model IDs configured under `models`.
## 4. Route Codex through the local service
Set the local client key in the current terminal:
```powershell
$env:FLEX247_LOCAL_PROXY_KEY = "replace-with-a-long-random-local-client-key"
```
Then add the following to user-level `~/.codex/config.toml` (`%USERPROFILE%\.codex\config.toml` on Windows):
```toml
model = "gpt-5.6-luna"
model_provider = "flex247_local"
[model_providers.flex247_local]
name = "Flex247 via CLIProxyAPI"
base_url = "http://127.0.0.1:8317/v1"
env_key = "FLEX247_LOCAL_PROXY_KEY"
wire_api = "responses"
```
Keep CLIProxyAPI running and launch `codex` from the same terminal. The request path is:
```text
Codex → http://127.0.0.1:8317/v1 → CLIProxyAPI → https://api.noflex.work/v1
```
## Troubleshooting
### `Invalid API key`
Codex must use the local client key under `api-keys`, not the Flex247 upstream key under `api-key-entries`.
### `unknown provider for model`
Make sure the requested model is listed under `openai-compatibility.models`, and that `name` and `alias` match the Codex configuration.
### Cannot connect to `127.0.0.1:8317`
Check that CLIProxyAPI is still running, the `config.yaml` path is correct, and the port is free.
### Upstream 404
The upstream `base-url` must be `https://api.noflex.work/v1`, without a missing or duplicated `/v1`.
## Official references
- [Configuration template](https://github.com/router-for-me/CLIProxyAPI/blob/main/config.example.yaml)
- [Project README](https://github.com/router-for-me/CLIProxyAPI#readme)
---
## Document: Connect Cockpit Tools to Flex AI
Source: https://ai-apidocs.noflex.work/en/cockpit-tools
> Human-readable source: [https://ai-apidocs.noflex.work/en/cockpit-tools](https://ai-apidocs.noflex.work/en/cockpit-tools)
# Connect Cockpit Tools to Flex AI
Cockpit Tools is a third-party, local-first account manager for AI IDEs and Codex. It can manage custom Codex model providers and expose an authenticated local Codex API service.
- [Official GitHub repository](https://github.com/jlcodes99/cockpit-tools)
- [Official downloads](https://github.com/jlcodes99/cockpit-tools/releases)
::: info Third-party project
Cockpit Tools is maintained by its open-source authors and community. Flex247 and this site do not develop or own it. Download only from the official repository and back up your existing Codex configuration before switching.
:::
## 1. Install Cockpit Tools
Choose the package for your operating system from the official Releases page:
- Windows: `.msi` or `x64-setup.exe`
- macOS: `.dmg`
- Linux: `.deb`, `.rpm` or `.AppImage`
Start Codex at least once so Cockpit Tools can discover its local configuration and instances.
## 2. Create a dedicated Flex247 key
Sign in to [Flex247](https://noflex.work/sign-in), open **API Keys**, and create a key dedicated to Cockpit Tools, such as `Cockpit-Windows`.
::: danger Protect the key
Never expose a real API key in screenshots, public documentation or chat messages. Revoke and replace any key that has been disclosed.
:::
## 3. Open Model Providers
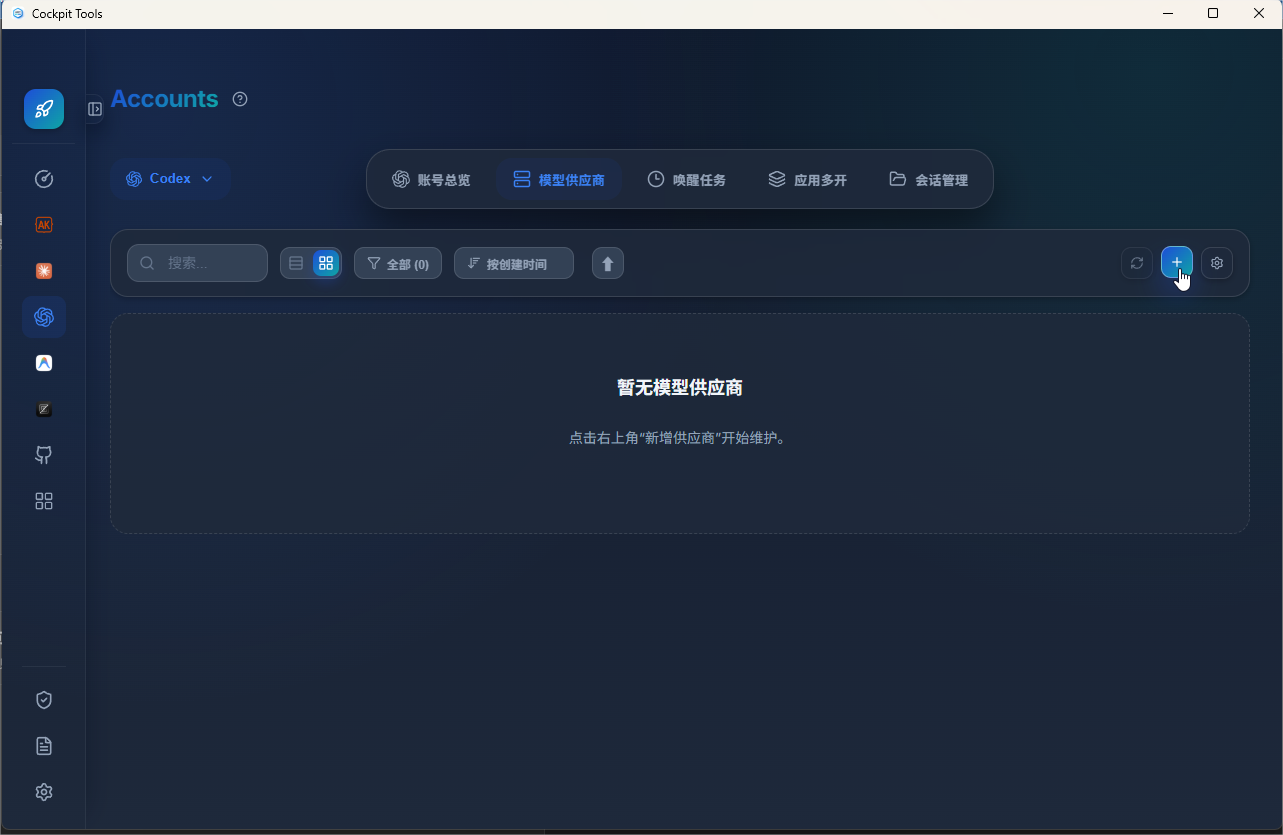
In Cockpit Tools, open **Accounts → Codex → Model Providers**, then click **+** in the upper-right corner.
Figure 1: Open Accounts → Codex → Model Providers, then click +. The screenshot shows the Chinese interface.
## 4. Choose Custom
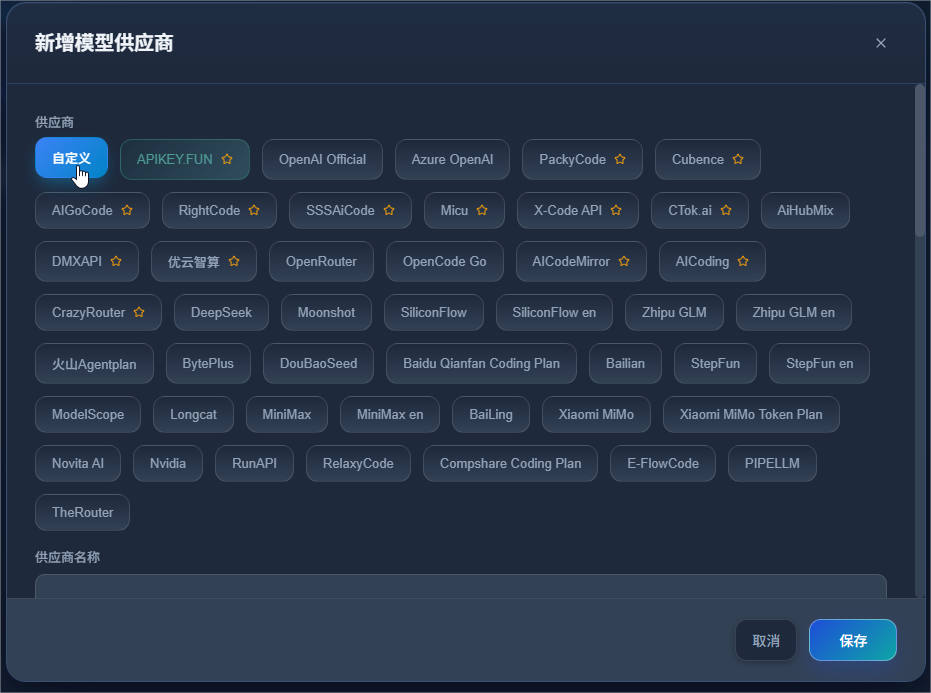
In the **Add Model Provider** dialog, choose **Custom** from the provider presets. Do not select a preset for an unrelated third-party service.
Figure 2: Choose Custom before entering the Flex247 values. The screenshot shows the Chinese interface.
## 5. Enter the Flex247 provider
Enter the common fields first:
| Cockpit Tools field | Value |
| --- | --- |
| Provider Name | `Flex247` |
| Base URL | `https://api.noflex.work/v1` |
| Protocol | **Responses Native** |
| WebSocket Transport | Leave off by default; enable only after confirming that the upstream supports Responses WebSocket |
| Website (Optional) | `https://noflex.work/` |
| API Key Page (Optional) | `https://noflex.work/keys` |
Use **Responses Native** for the normal setup. Set the Base URL only through `/v1`: do not append `/responses` or duplicate the suffix as `/v1/v1`.
### Chat-Completions-only compatibility path
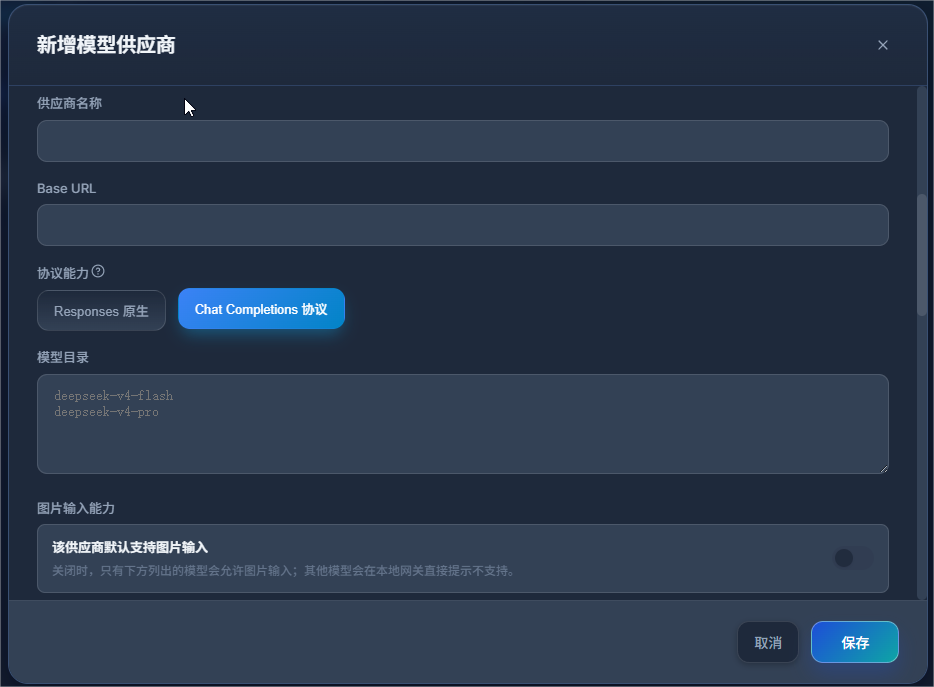
Select **Chat Completions** only when the target upstream explicitly lacks native `/v1/responses` support and you intentionally want Cockpit Tools to convert the protocol through its local gateway. Selecting it reveals the **Model Catalog** and image-routing fields.
Figure 3: Base fields and Chat Completions compatibility fields. The highlighted protocol and sample models are illustrative; use Responses Native for the normal Flex247 Codex setup.
| Chat Completions field | How to fill it |
| --- | --- |
| Model Catalog | Enter one exact model ID from [Model Square](https://noflex.work/pricing) per line |
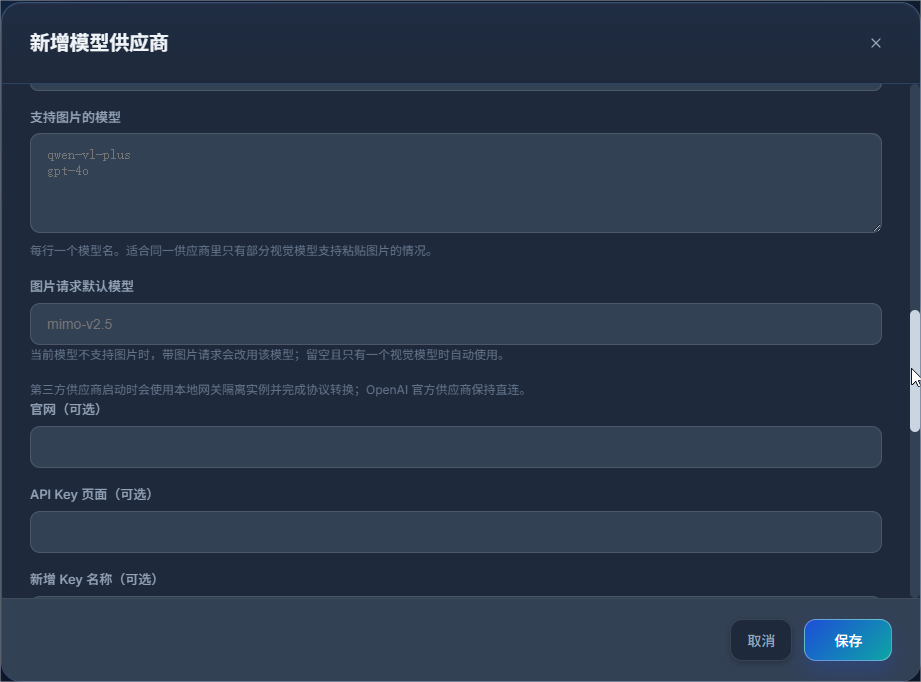
| Image Input | Enable only when every model in the catalog accepts image input |
| Vision Models | If only some models accept images, leave the provider-wide toggle off and enter one vision model ID per line |
| Image Route Model | Optional; set only when image requests should fall back to a confirmed vision model, otherwise leave blank |
Figure 4: Optional image-routing fields in Chat Completions mode. Configure them only for verified model capabilities.
::: warning Do not copy the screenshot examples
`deepseek-v4-flash`, `deepseek-v4-pro`, `qwen-vl-plus`, `gpt-4o` and `mimo-v2.5` in Figures 3 and 4 are Cockpit Tools interface examples, not model recommendations from this site. Use the current IDs and capabilities shown in Model Square.
:::
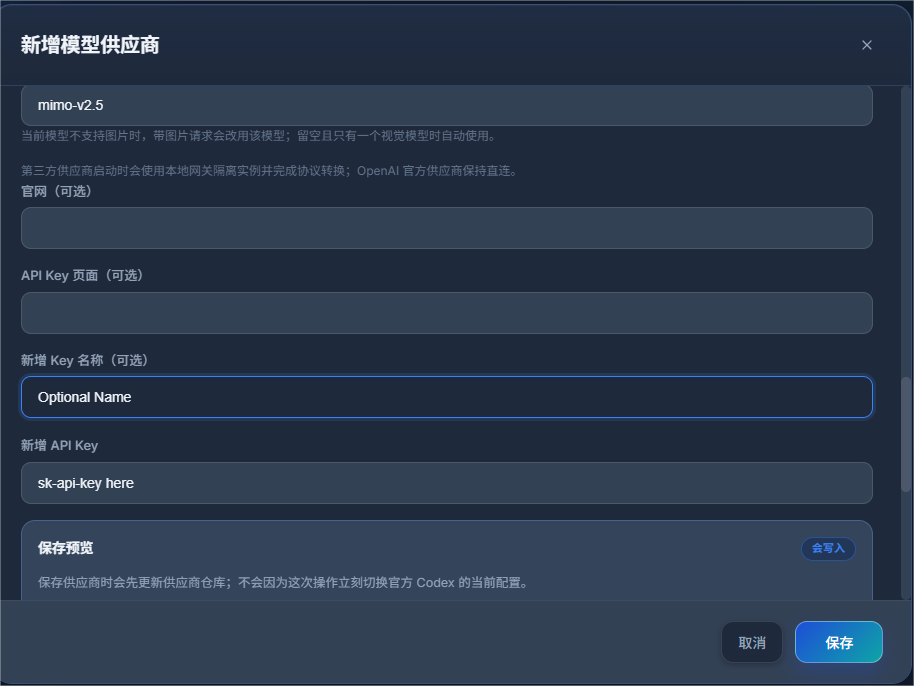
## 6. Add the API key and save
Scroll down and enter:
| Cockpit Tools field | Value |
| --- | --- |
| New Key Name (Optional) | A recognizable label such as `Cockpit-Windows` |
| New API Key | The dedicated Flex247 key created in Step 2 |
A new provider requires at least one API key. Review **Save Preview**, then click **Save**.
Figure 5: Enter the key label and API key, review the save preview, then save. sk-api-key-here is a placeholder.
::: tip Saving does not switch the active provider
Saving updates the Cockpit Tools provider store, but it does not immediately change the current Codex provider, Base URL or `auth.json`. The active Codex configuration changes only when the matching Codex API-key account is saved or switched, or when the provider is enabled and its instance is started.
:::
## 7. Test, enable and start Codex
1. Return to Model Providers. If the provider contains several keys, first select the key to use on its provider card.
2. Click **One-click Test**, select Flex247 and run the chat test. If Cockpit Tools cannot determine a model automatically, enter an exact Model Square ID.
3. Select the target Codex instance on the provider card.
4. Click the play button, **Enable and Start**. If it is unavailable, open **App Multi-Launch** and start that instance once to initialize it.
5. Send a short, read-only request in the newly launched Codex instance, then verify the successful request and expected model in Flex247 [Usage Logs](https://noflex.work/usage-logs).
## 8. Optional: run the local Codex API service
Use **Codex API Service** when several accounts or providers should share one local endpoint:
1. Keep the bind address on `127.0.0.1`. Do not bind to `0.0.0.0` without proper network access controls.
2. Create a separate local client key.
3. Add the Flex247 provider and API key to the service account or provider pool.
4. Enable the service and use the Base URL shown in the UI, normally `http://127.0.0.1:/v1`.
The local client key authenticates clients to Cockpit Tools. The Flex247 key authenticates Cockpit Tools to the upstream API. Do not mix them up.
## Troubleshooting
### 404 or Responses error
- Verify that the Base URL includes `/v1`.
- Select **Responses Native**.
- Do not append `/responses` to the Base URL.
### Saving reports a missing API key
A new provider must contain at least one key. Return to the bottom of the form and paste the complete dedicated Flex247 key into **New API Key**.
### Image input fails in Chat Completions mode
- Confirm in Model Square that the target model supports image input.
- If only some models accept images, turn off provider-wide image support and list the exact IDs under **Vision Models**, one per line.
- Set **Image Route Model** only when automatic fallback is required.
### Codex still uses the old provider
Return to the provider card, select the correct Codex instance, then click **Enable and Start**. Saving the provider alone does not switch the active Codex configuration.
### The local API service is unreachable
Check that the service is running, the port is free, and the client is using the local client key rather than the upstream Flex247 key.
## Official references
- [Cockpit Tools README](https://github.com/jlcodes99/cockpit-tools#readme)
- [Model-provider manager source](https://github.com/jlcodes99/cockpit-tools/blob/main/src/components/codex/CodexModelProviderManager.tsx)
- [Codex API Service architecture](https://github.com/jlcodes99/cockpit-tools/blob/main/docs/CODEX_API_SERVICE_HANDOFF.md)
---
## Document: Codex
Source: https://ai-apidocs.noflex.work/en/codex
> Human-readable source: [https://ai-apidocs.noflex.work/en/codex](https://ai-apidocs.noflex.work/en/codex)
# Codex
A Codex custom provider uses the Responses API. Select a Flex247 model that supports `/v1/responses`.
## 1. Set the API key
### Windows PowerShell
```powershell
$env:FLEX247_API_KEY = "sk-your-flex247-key"
```
### macOS / Linux
```bash
export FLEX247_API_KEY="sk-your-flex247-key"
```
## 2. Edit `config.toml`
User-level configuration is stored at:
- Windows: `%USERPROFILE%\.codex\config.toml`
- macOS / Linux: `~/.codex/config.toml`
Add:
```toml
model = "your-responses-model-id"
model_provider = "flex247"
model_reasoning_effort = "medium"
[model_providers.flex247]
name = "Flex247"
base_url = "https://api.noflex.work/v1"
env_key = "FLEX247_API_KEY"
wire_api = "responses"
```
::: tip Model requirement
Codex custom providers currently use `responses` as the wire API. Use a Responses-compatible model from Model Square.
:::
## 3. Start and verify
From a test project directory, run:
```bash
codex
```
Ask Codex to list the current directory without modifying files, then confirm the request in Flex247 **Usage Logs**.
## Troubleshooting
### Missing environment variable
Set `FLEX247_API_KEY` in the same terminal that launches Codex.
### 404 or Responses error
Verify `base_url = "https://api.noflex.work/v1"` and select a Responses-compatible model.
### Configuration does not apply
Provider, authentication and Base URL settings belong in user-level `config.toml`, not only in a project `.codex/config.toml`.
---
## Document: Join the Flex247 Community
Source: https://ai-apidocs.noflex.work/en/community
> Human-readable source: [https://ai-apidocs.noflex.work/en/community](https://ai-apidocs.noflex.work/en/community)
# Join the Flex247 Community
Get integration help, share workflows and learn from other Flex247 users.
Flex247 Communityhttps://community.noflex.work
[Join the community](https://community.noflex.work)
## Before asking for help
Include:
- Client or SDK name
- Operating system and client version
- Model ID
- Base URL without any key
- HTTP status and error message
- Approximate time and matching usage log
::: danger Never share secrets
Hide complete API keys, redemption codes, account details and server credentials before posting screenshots.
:::
---
## Document: Connect DeepSeek Harness to Flex AI
Source: https://ai-apidocs.noflex.work/en/deepseek-harness
> Human-readable source: [https://ai-apidocs.noflex.work/en/deepseek-harness](https://ai-apidocs.noflex.work/en/deepseek-harness)
# Connect DeepSeek Harness to Flex AI
DeepSeek Harness (`dsh`) is an open-source agent harness developed by DeepSeek AI. Its local Web UI provides session and workspace management, agent presets, plugins and custom model providers. Flex AI (Flex247) can be connected through the OpenAI Responses protocol.
- [Official GitHub repository](https://github.com/deepseek-ai/deepseek-harness)
- [Official README](https://github.com/deepseek-ai/deepseek-harness/blob/master/README.md)
- [Official model-provider guide](https://github.com/deepseek-ai/deepseek-harness/blob/master/docs/user/guide/providers.md)
::: info Developer preview
DeepSeek Harness is still a developer preview. Later releases may change its interface, configuration fields or behavior. The screenshots and steps on this page reflect the current version.
:::
::: danger Do not expose it to the public Internet
Do not publish DeepSeek Harness through public port forwarding, an open reverse proxy or a public bind address. It may have access to API keys, session content, code and local tool permissions.
Keep the default service on `127.0.0.1:3080`. For access from another device, use Tailscale or a similar trusted private-network solution and allow only your own trusted devices.
:::
## 1. Install and start DeepSeek Harness
Install Node.js, then run the command provided by the project:
```bash
npx @deepseek-ai/dsh web
```
Open the local Web UI at:
Keep the terminal that runs this command open. If the page is unavailable, confirm that the command is still running and port `3080` is not already in use.
## 2. Create a dedicated Flex247 key
Sign in to [Flex247](https://noflex.work/sign-in), open **API Keys**, and create a key dedicated to DeepSeek Harness, such as `DeepSeek-Harness-Windows`.
::: danger Protect the key
An API key grants access to your account usage. Never place a real key in screenshots, public documentation, chats or source repositories. The API-key field is intentionally blank in this guide's screenshot.
:::
## 3. Open Add Custom Provider
In DeepSeek Harness:
1. Click **Settings** in the lower-left corner.
2. Open **Models**.
3. Click **Add Custom Provider**.
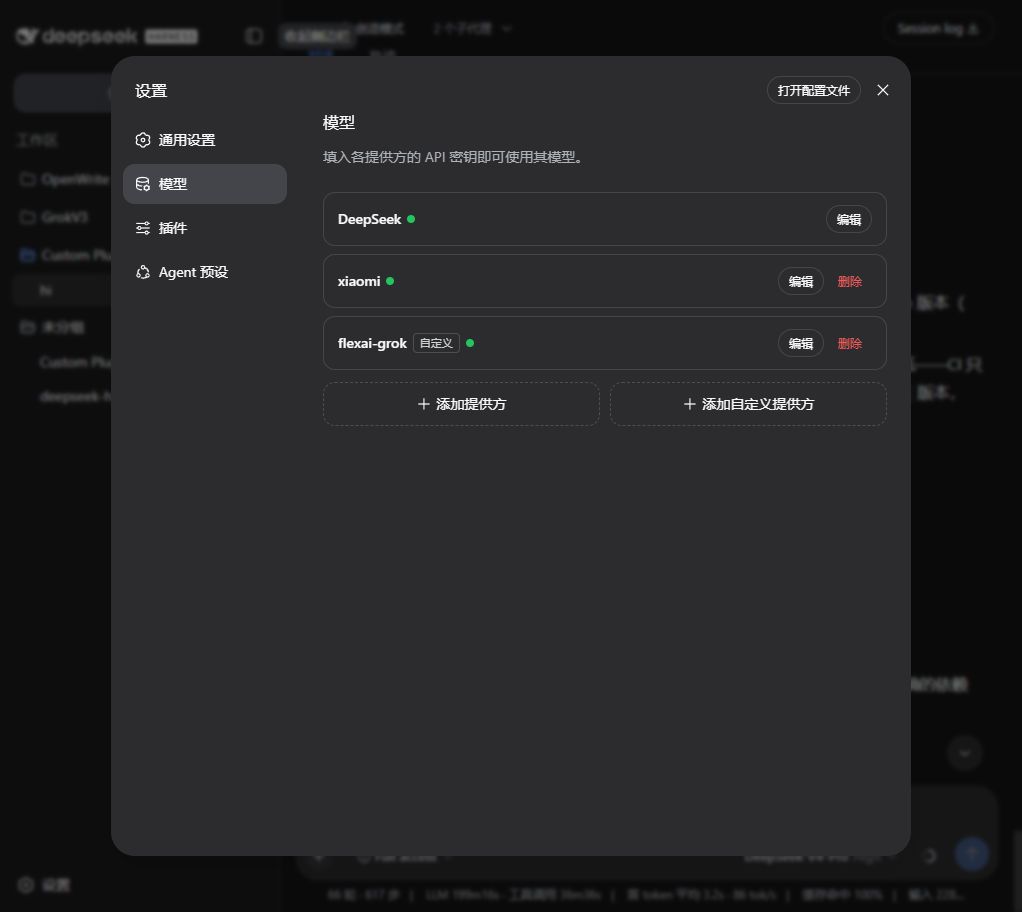
Figure 1: Open Settings → Models and click Add Custom Provider. The screenshot shows the Chinese interface.
## 4. Enter the Flex AI provider
Use these values:
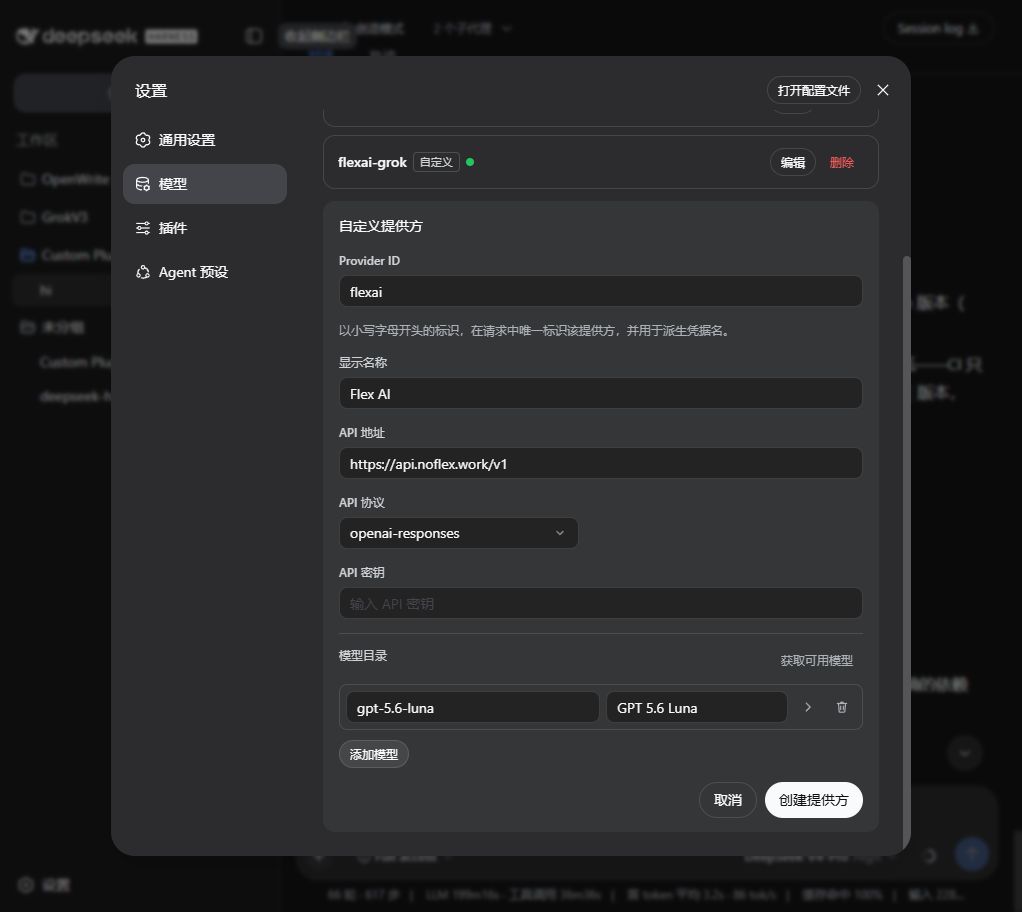
| DeepSeek Harness field | Value |
| --- | --- |
| Provider ID | `flexai` |
| Display name | `Flex AI` |
| API URL | `https://api.noflex.work/v1` |
| API protocol | `openai-responses` |
| API key | Your dedicated Flex247 key |
| Model catalog | Click **Add Model** and enter an exact model ID from Model Square |
The model ID must exactly match [Model Square](https://noflex.work/pricing). For example, start with `gpt-5.6-luna` and use `GPT 5.6 Luna` as its display name.
Figure 2: Example Flex AI custom provider. The API-key field is intentionally blank.
::: tip Keep the URL and protocol separate
Set the API URL only through `/v1`. Do not append `/responses` or duplicate the suffix as `/v1/v1`. The `openai-responses` selection controls the request protocol.
:::
::: warning Treat the Provider ID as permanent
The Provider ID is referenced by requests, sessions, model defaults and credentials. To change it, create a new provider and remove the old one. The display name, URL, protocol, key and models remain editable.
:::
::: danger Currently known incompatible models
Based on current compatibility testing, do not use `grok-4.5-free` or `grok-4.6-free` in DeepSeek Harness. Because their architecture is incompatible with the harness, these models trigger an infinite loop. This is not an official DeepSeek Harness compatibility statement.
If either model is selected accidentally, stop the current task immediately, switch to a compatible model and test again in a new session.
:::
## 5. Create the provider and test
1. Add at least one model, then click **Create Provider**.
2. Return to the session view and click **Select Model** below the prompt box.
3. Select **Flex AI** and the model you added.
4. Start a new session and send a short, read-only test request.
5. Confirm the successful request and expected model ID in Flex247 **Usage Logs**.
Provider and model routing changes take effect on the next request; DeepSeek Harness does not need to be restarted.
After entering the URL and key, you can also click **Get Available Models** before saving. If the upstream does not expose a compatible `GET /models` endpoint, add the exact model ID manually.
## Troubleshooting
### Get Available Models returns 401
Verify that the API key is complete and active, with available quota and permission for the target model.
### 404 or Responses error
- The API URL must be `https://api.noflex.work/v1`.
- Select `openai-responses` as the API protocol.
- Do not append `/responses` to the API URL.
### The model is missing from the selector
Edit the Flex AI provider and confirm that the model catalog contains at least one exact model ID. Use **Add Model** when automatic discovery is unavailable.
### The session repeats indefinitely
Stop the task immediately, confirm that neither `grok-4.5-free` nor `grok-4.6-free` is selected, and start a new session with a compatible model.
---
## Document: FAQ
Source: https://ai-apidocs.noflex.work/en/faq
> Human-readable source: [https://ai-apidocs.noflex.work/en/faq](https://ai-apidocs.noflex.work/en/faq)
# FAQ
## 401: Authentication failed
Check that the key is complete, contains no whitespace and is sent with the correct header:
```http
Authorization: Bearer sk-your-flex247-key
```
Disable and replace any key that has been exposed publicly.
## 404 / 405: Wrong path or protocol
- OpenAI Chat: `https://api.noflex.work/v1/chat/completions`
- Responses: `https://api.noflex.work/v1/responses`
- Anthropic Messages: `https://api.noflex.work/v1/messages`
## 429: Too many requests
Reduce concurrency and add exponential backoff. If the admin UI also returns 429, wait briefly and check whether your proxy or firewall applies an unusually low per-IP limit.
## No available channel
Check the API key group, model restrictions, account balance and exact model ID, then retry.
## No output for a long time
Check **Usage Logs** to confirm that the request arrived. Long reasoning and multimodal jobs may take more time; use streaming when available.
## CLI works but the IDE extension fails
The IDE may have cached old environment variables. Fully exit it, reopen it and verify the Base URL, key and model ID.
## How do I verify charges?
Use **Usage Logs** to review the model, input, cache, output and final charge. Current model pricing is shown in [Model Square](https://noflex.work/pricing).
## I still need help
Visit [Flex247 Community](https://community.noflex.work) with the timestamp, model ID, status code and a screenshot with secrets hidden. Never post a complete API key.
---
## Document: Quickstart
Source: https://ai-apidocs.noflex.work/en/getting-started
> Human-readable source: [https://ai-apidocs.noflex.work/en/getting-started](https://ai-apidocs.noflex.work/en/getting-started)
# Quickstart
Create an account, generate an API key and send your first Flex247 request.
## 1. Create your account
[Create a Flex247 account](https://noflex.work/sign-up), or [sign in](https://noflex.work/sign-in) if you already have one.
## 2. Generate an API key
Open **API Keys** after signing in and create a new key. Use separate keys for different devices and applications so usage and revocation stay easy to manage.
::: warning Store it safely
The complete key is normally displayed only once. Never expose it in screenshots, chat messages or public repositories.
:::
## 3. Choose a model
Copy a current model ID from [Model Square](https://noflex.work/pricing). The value must match exactly.
## 4. Send your first request
Replace the placeholder key and model ID:
```bash
curl https://api.noflex.work/v1/chat/completions \
-H "Authorization: Bearer sk-your-flex247-key" \
-H "Content-Type: application/json" \
-d '{
"model": "your-model-id",
"messages": [
{"role": "user", "content": "Reply only: Flex247 connected"}
]
}'
```
If you receive a model response, the endpoint, key and model are configured correctly.
## 5. Use environment variables
### Windows PowerShell
```powershell
$env:FLEX247_API_KEY = "sk-your-flex247-key"
$env:FLEX247_BASE_URL = "https://api.noflex.work/v1"
```
### macOS / Linux
```bash
export FLEX247_API_KEY="sk-your-flex247-key"
export FLEX247_BASE_URL="https://api.noflex.work/v1"
```
## Next steps
- OpenAI-style SDKs: [OpenAI Compatible](./openai-compatible)
- Anthropic Messages: [Anthropic Protocol](./anthropic-compatible)
- Coding agents: [Claude Code](./claude-code), [Codex](./codex) or [OpenCode](./opencode)
---
## Document: Flex247 API Documentation
Source: https://ai-apidocs.noflex.work/en/
> Human-readable source: [https://ai-apidocs.noflex.work/en/](https://ai-apidocs.noflex.work/en/)
# Flex247 API Documentation
Flex247 provides OpenAI-compatible and Anthropic-compatible access to multiple AI model ecosystems through one API gateway.
- Human documentation: https://ai-apidocs.noflex.work/en
- API base URL: https://api.noflex.work/v1
- Community: https://community.noflex.work
- Machine-readable index: https://ai-apidocs.noflex.work/llms.txt
---
## Document: Images & Video
Source: https://ai-apidocs.noflex.work/en/media
> Human-readable source: [https://ai-apidocs.noflex.work/en/media](https://ai-apidocs.noflex.work/en/media)
# Images & Video
Multimodal parameters differ by model. Check [Model Square](https://noflex.work/pricing) for capabilities, billing units and supported dimensions.
## Image generation
```bash
curl https://api.noflex.work/v1/images/generations \
-H "Authorization: Bearer sk-your-flex247-key" \
-H "Content-Type: application/json" \
-d '{
"model": "your-image-model-id",
"prompt": "A clean product hero image, soft studio lighting",
"size": "1024x1024",
"n": 1
}'
```
Responses may contain image URLs or Base64 data. Read the returned fields instead of assuming that every model uses the same format.
## Video generation
Video is commonly asynchronous: submit a job, store its task ID, poll status and download the completed result.
```bash
curl https://api.noflex.work/v1/videos \
-H "Authorization: Bearer sk-your-flex247-key" \
-H "Content-Type: application/json" \
-d '{
"model": "your-video-model-id",
"prompt": "A cinematic product reveal with slow camera movement"
}'
```
::: warning Model-specific behavior
Paths and fields for duration, aspect ratio, first or last frames and task status may differ. Follow the model requirements shown by Flex247 when a model has dedicated parameters.
:::
## Production guidance
- Use dedicated keys and quotas for image and video workloads.
- Store task IDs to avoid duplicate submissions and charges after a network interruption.
- Validate user prompts and input size.
- Copy completed assets to your own object storage instead of relying on temporary URLs.
---
## Document: Models & Endpoints
Source: https://ai-apidocs.noflex.work/en/models-and-endpoints
> Human-readable source: [https://ai-apidocs.noflex.work/en/models-and-endpoints](https://ai-apidocs.noflex.work/en/models-and-endpoints)
# Models & Endpoints
Flex247 supports two common API patterns. Choose the one required by your SDK or client.
OpenAI Compatiblehttps://api.noflex.work/v1
Anthropic Protocolhttps://api.noflex.work
## Common paths
| Use case | Method | Path |
| --- | --- | --- |
| Chat Completions | `POST` | `/v1/chat/completions` |
| Responses | `POST` | `/v1/responses` |
| Anthropic Messages | `POST` | `/v1/messages` |
| Model list | `GET` | `/v1/models` |
| Image generation | `POST` | `/v1/images/generations` |
::: tip Should the Base URL include `/v1`?
OpenAI-style SDKs normally use `https://api.noflex.work/v1`. Anthropic clients such as Claude Code normally use `https://api.noflex.work` and append `/v1/messages` themselves.
:::
## Model IDs
Copy the current model ID from [Model Square](https://noflex.work/pricing). Do not guess the ID or add spaces and version suffixes.
```json
{
"model": "your-model-id"
}
```
## Choose the protocol
- A client asking for `base_url`, `api_key` or Chat Completions usually needs OpenAI Compatible.
- A client asking for `ANTHROPIC_BASE_URL`, `ANTHROPIC_AUTH_TOKEN` or Messages needs Anthropic Protocol.
- A Codex custom provider requires a Responses-compatible model and `/v1/responses`.
## Groups and model restrictions
For “no available channel” or “model unavailable” errors, check the API key group, model restrictions and account balance before retrying.
---
## Document: OpenAI Compatible
Source: https://ai-apidocs.noflex.work/en/openai-compatible
> Human-readable source: [https://ai-apidocs.noflex.work/en/openai-compatible](https://ai-apidocs.noflex.work/en/openai-compatible)
# OpenAI Compatible
Use this protocol with OpenAI-style SDKs, Chat Completions and supported Responses models.
Base URLhttps://api.noflex.work/v1
## cURL
```bash
curl https://api.noflex.work/v1/chat/completions \
-H "Authorization: Bearer sk-your-flex247-key" \
-H "Content-Type: application/json" \
-d '{
"model": "your-model-id",
"messages": [
{"role": "system", "content": "You are a concise assistant."},
{"role": "user", "content": "Give me three product name ideas."}
]
}'
```
## JavaScript / TypeScript
```bash
npm install openai
```
```js
import OpenAI from 'openai'
const client = new OpenAI({
apiKey: process.env.FLEX247_API_KEY,
baseURL: 'https://api.noflex.work/v1'
})
const result = await client.chat.completions.create({
model: 'your-model-id',
messages: [{ role: 'user', content: 'Explain this function.' }]
})
console.log(result.choices[0].message.content)
```
## Python
```bash
pip install openai
```
```python
import os
from openai import OpenAI
client = OpenAI(
api_key=os.environ["FLEX247_API_KEY"],
base_url="https://api.noflex.work/v1",
)
result = client.chat.completions.create(
model="your-model-id",
messages=[{"role": "user", "content": "Write a short launch checklist."}],
)
print(result.choices[0].message.content)
```
## Streaming
```js
const stream = await client.chat.completions.create({
model: 'your-model-id',
messages: [{ role: 'user', content: 'Write a short story.' }],
stream: true
})
for await (const chunk of stream) {
process.stdout.write(chunk.choices[0]?.delta?.content ?? '')
}
```
## Responses API
Use `/v1/responses` only with models that support Responses:
```bash
curl https://api.noflex.work/v1/responses \
-H "Authorization: Bearer sk-your-flex247-key" \
-H "Content-Type: application/json" \
-d '{"model":"your-responses-model-id","input":"Return only OK"}'
```
---
## Document: OpenCode
Source: https://ai-apidocs.noflex.work/en/opencode
> Human-readable source: [https://ai-apidocs.noflex.work/en/opencode](https://ai-apidocs.noflex.work/en/opencode)
# OpenCode
Configure Flex247 in `opencode.json`. Choose one provider definition based on your model protocol.
## 1. Install and verify
```bash
npm install -g opencode-ai
opencode --version
```
## 2. OpenAI Compatible configuration
Create `opencode.json` in the project directory:
```json
{
"$schema": "https://opencode.ai/config.json",
"provider": {
"flex247": {
"npm": "@ai-sdk/openai-compatible",
"name": "Flex247",
"options": { "baseURL": "https://api.noflex.work/v1" },
"models": {
"your-model-id": { "name": "your-model-id" }
}
}
},
"model": "flex247/your-model-id"
}
```
## 3. Anthropic Protocol configuration
```json
{
"$schema": "https://opencode.ai/config.json",
"provider": {
"flex247": {
"npm": "@ai-sdk/anthropic",
"name": "Flex247",
"options": { "baseURL": "https://api.noflex.work" },
"models": {
"your-claude-model-id": { "name": "your-claude-model-id" }
}
}
},
"model": "flex247/your-claude-model-id"
}
```
## 4. Save the key
```bash
opencode providers login --provider flex247
```
Paste your Flex247 API key when prompted.
## 5. Test
Run `opencode` inside a test directory. Start with a read-only task and confirm the connection and permissions before using a production project.
---
## Document: Use the Flex AI API in OpenWrite
Source: https://ai-apidocs.noflex.work/en/openwrite
> Human-readable source: [https://ai-apidocs.noflex.work/en/openwrite](https://ai-apidocs.noflex.work/en/openwrite)
# Use the Flex AI API in OpenWrite
OpenWrite is an extensible AI writing platform for novels and long-form projects. It provides conversational writing, continuation, outlining, analysis and project-knowledge tools. Because it supports custom AI providers, it can connect to Flex AI (Flex247) through the OpenAI Compatible API.
::: warning Ownership and relationship notice
OpenWrite, its software, brand, interface and related intellectual property belong to the OpenWrite author. Flex247 and this site are not the developer or owner of OpenWrite. The site owner is simply one of its users and is sharing this guide after finding the app useful. This page does not imply an official partnership, authorization or endorsement by the OpenWrite author.
:::
## 1. Download and install OpenWrite
Before configuring Flex AI, download and launch OpenWrite.
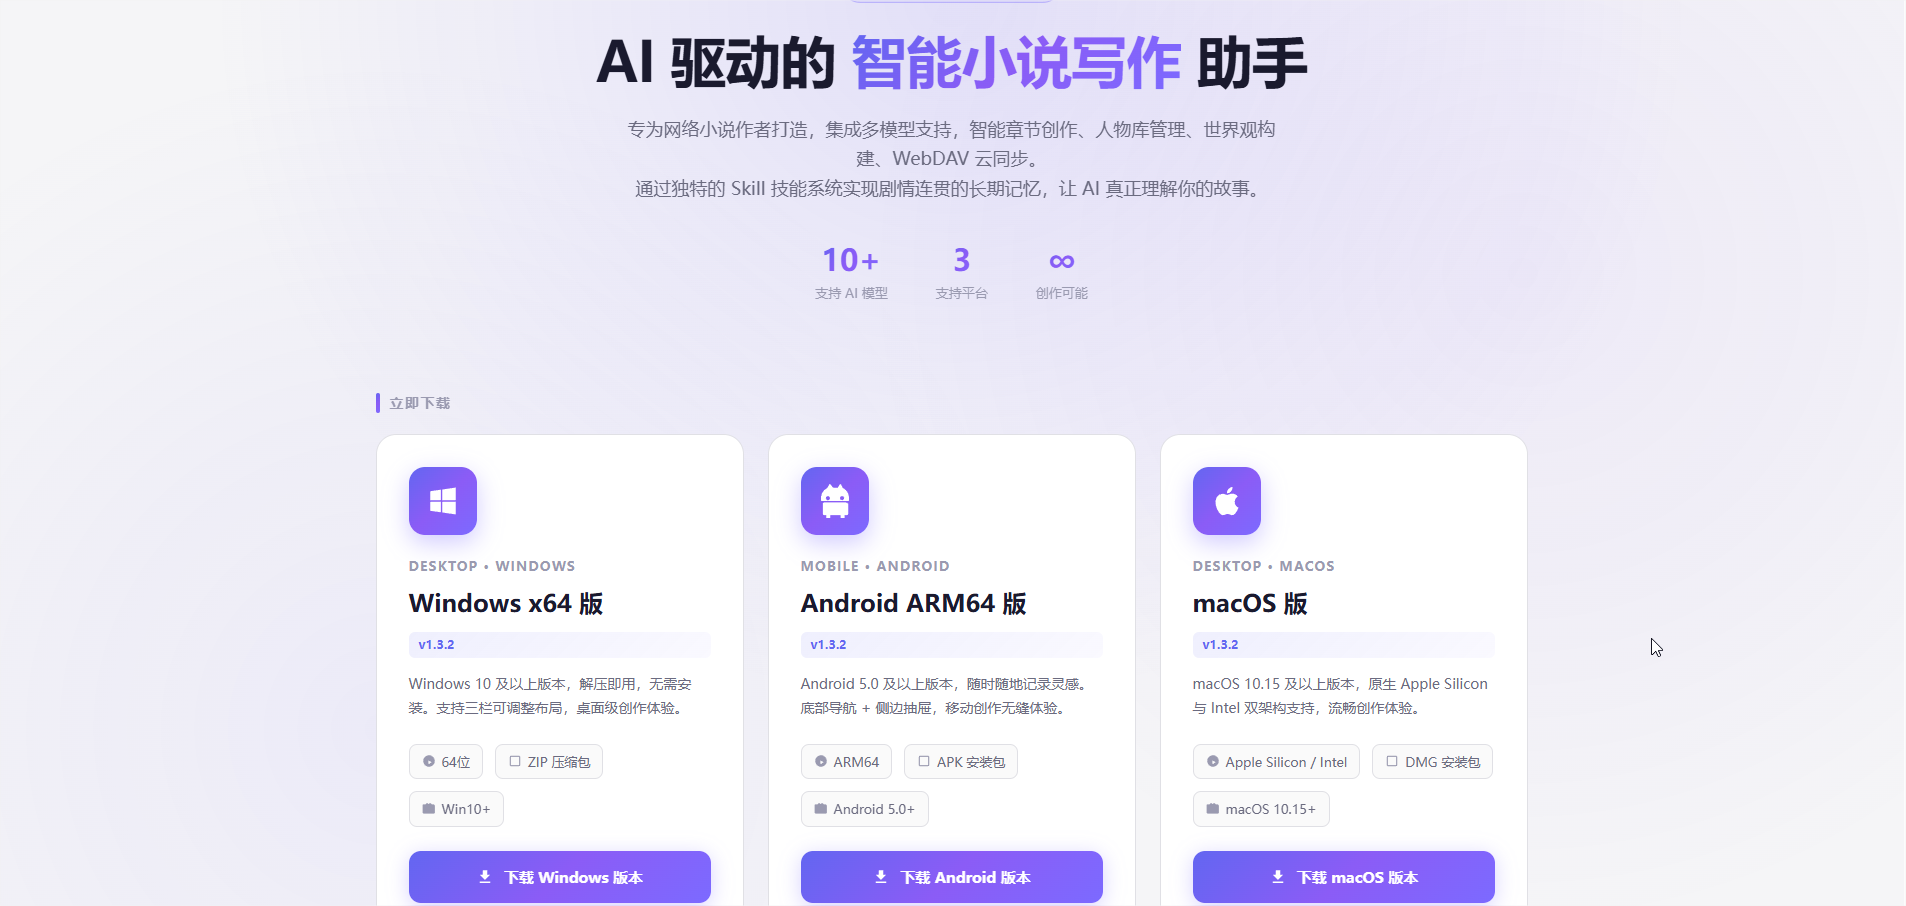
**Download URL:** [http://openxz.cn/](http://openxz.cn/)
On the download page, choose the version for your device:
- **Windows**: Download the Windows x64 ZIP archive, extract it and run the app.
- **Android**: Download the Android ARM64 APK package.
- **macOS**: Download the macOS DMG package.
Figure 1: Choose the OpenWrite version for your operating system.
After downloading and launching OpenWrite, continue with the Flex AI configuration below.
## Before you begin
- A working [Flex247 account](https://noflex.work/sign-in).
- A valid Flex AI API key. Create a separate key for OpenWrite, such as `OpenWrite-Windows`.
- An exact model ID from [Model Square](https://noflex.work/pricing).
::: danger Keep your key private
An API key grants access to your account usage. Never expose a real key in chats, screenshots, documentation or public repositories. The key in this guide is masked.
:::
## 2. Open Settings
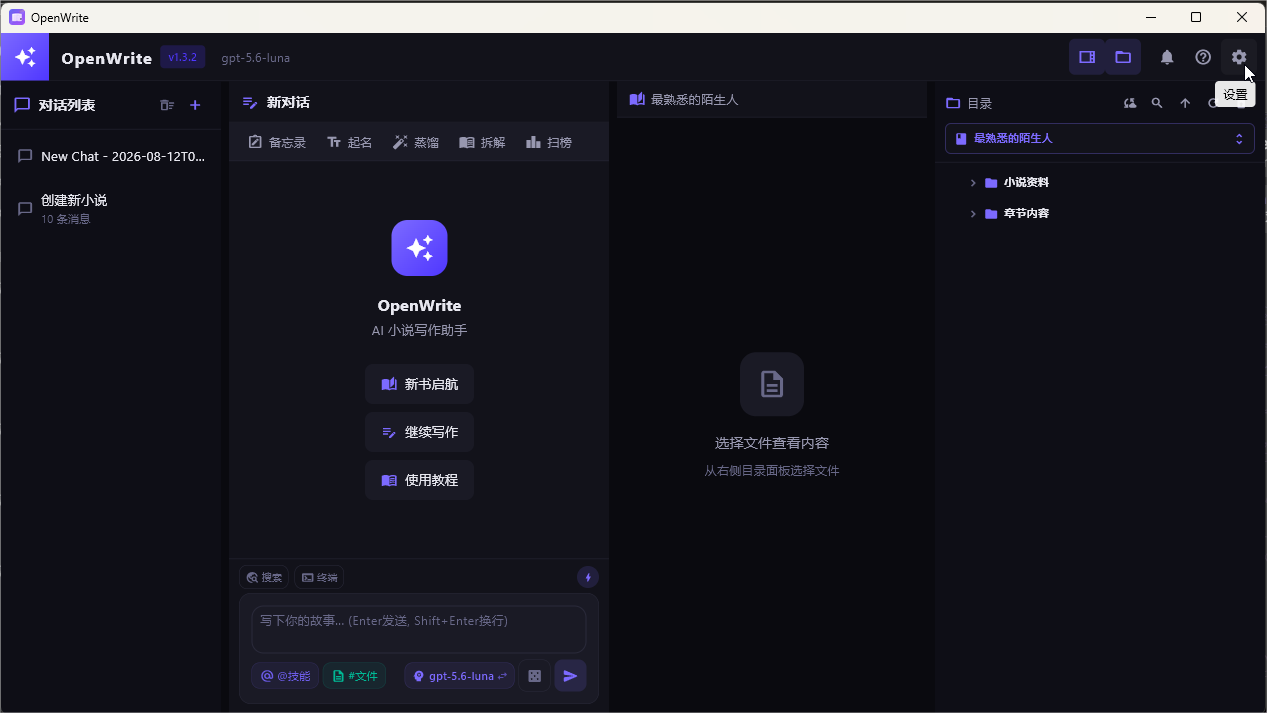
Start OpenWrite, then click the **gear icon (Settings)** in the upper-right corner.
Figure 2: The Settings button is in the upper-right corner of the OpenWrite window.
## 3. Choose a custom provider
In the Settings window:
1. Open the **AI Provider** tab.
2. Select **Custom Access** under **Quick Setup**.
3. Enter the Flex AI values below.
| OpenWrite field | Value |
| --- | --- |
| API URL | `https://api.noflex.work/v1` |
| API format | **OpenAI** |
| API Key | The key created in your Flex247 console |
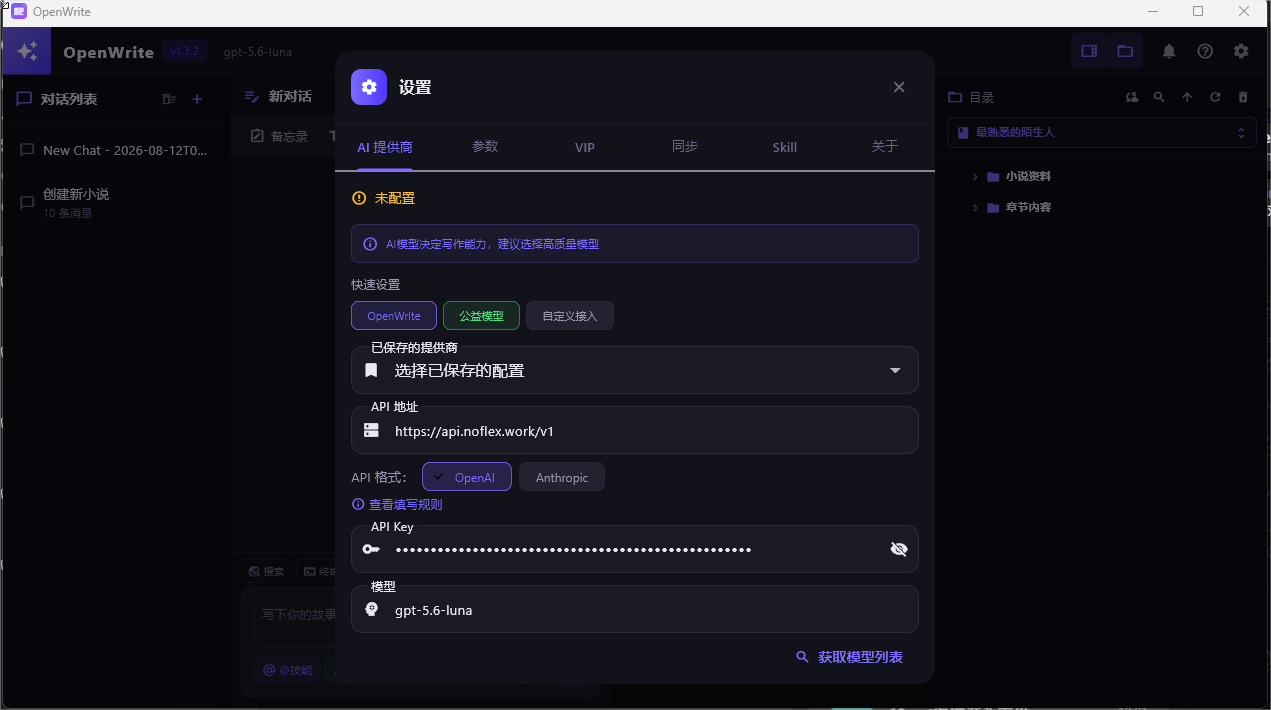
| Model | An exact model ID from Model Square, such as `gpt-5.6-luna` in the screenshot |
Figure 3: Example OpenAI Compatible configuration for Flex AI. The API key is masked.
## 4. Load models and save
1. After entering the API URL and key, click **Get Model List**.
2. Select a model. If manual entry is supported, paste the exact model ID from Model Square.
3. Click **Save Configuration**.
4. Return to the main window and send a short test prompt.
::: tip Correct Base URL
OpenWrite requires `/v1` for the OpenAI Compatible endpoint. Do not use `https://api.noflex.work` without `/v1`, and do not duplicate it as `/v1/v1`.
:::
## Recommended models
For OpenWrite, we recommend trying these models first:
- **GPT 5.6 Luna**
- **DeepSeek V4 Flash**
- **GLM 5.2**
- **Qwen 3.8**
- **Kimi K3**
A model's display name may differ slightly from its full backend model ID. Click **Get Model List** and select it directly whenever possible. For manual entry, use the exact model ID shown in [Model Square](https://noflex.work/pricing).
## Create a dedicated API key
1. Sign in to [Flex247](https://noflex.work/sign-in).
2. Open **API Keys**.
3. Create a clearly named key, such as `OpenWrite-Windows`.
4. Apply the required group, model restrictions and quota.
5. Save the complete key immediately, then paste it into OpenWrite.
A dedicated key makes usage tracking, rotation and revocation easier without affecting your other applications.
## Troubleshooting
### The model list does not load
- Confirm the API URL is `https://api.noflex.work/v1`.
- Confirm **OpenAI** is selected as the API format.
- Check that the key is active, has available quota and can access the requested model group.
- Fully quit and reopen OpenWrite before trying again.
### Content generation fails after saving
- The model ID must exactly match Model Square.
- Remove quotation marks or spaces around the model ID.
- Test with a known working text model first.
- Check the Flex247 usage logs for the exact error.
::: info Screenshot version
The screenshots show OpenWrite `v1.3.2` for Windows. Button positions and labels may change slightly in later releases, while the API URL, OpenAI format and key requirements remain the same.
:::
# Language: 简体中文 (zh)
---
## Document: Anthropic Protocol
Source: https://ai-apidocs.noflex.work/anthropic-compatible
> Human-readable source: [https://ai-apidocs.noflex.work/anthropic-compatible](https://ai-apidocs.noflex.work/anthropic-compatible)
# Anthropic Protocol
适用于 Claude Code、Anthropic SDK 和使用 Messages API 的应用。
## cURL
```bash
curl https://api.noflex.work/v1/messages \
-H "x-api-key: sk-your-flex247-key" \
-H "anthropic-version: 2023-06-01" \
-H "content-type: application/json" \
-d '{
"model": "your-claude-model-id",
"max_tokens": 512,
"messages": [{"role": "user", "content": "Return only OK"}]
}'
```
## JavaScript / TypeScript
```bash
npm install @anthropic-ai/sdk
```
```js
import Anthropic from '@anthropic-ai/sdk'
const client = new Anthropic({
apiKey: process.env.FLEX247_API_KEY,
baseURL: 'https://api.noflex.work'
})
const message = await client.messages.create({
model: 'your-claude-model-id',
max_tokens: 512,
messages: [{ role: 'user', content: 'Review this API design.' }]
})
console.log(message.content[0].text)
```
## Python
```bash
pip install anthropic
```
```python
import os
from anthropic import Anthropic
client = Anthropic(
api_key=os.environ["FLEX247_API_KEY"],
base_url="https://api.noflex.work",
)
message = client.messages.create(
model="your-claude-model-id",
max_tokens=512,
messages=[{"role": "user", "content": "Summarize this change."}],
)
print(message.content[0].text)
```
## Kesilapan konfigurasi biasa
- Elakkan `/v1/v1` berulang dalam `ANTHROPIC_BASE_URL`.
- Gunakan ID model penuh yang dipaparkan dalam Dataran Model Flex247.
- Buang ruang tambahan pada `x-api-key` atau `ANTHROPIC_AUTH_TOKEN`.
- Jika klien hanya menyokong permintaan gaya OpenAI, gunakan [Serasi OpenAI](./openai-compatible).
---
## Document: Permintaan Teks & Kod
Source: https://ai-apidocs.noflex.work/ms/api-examples
> Human-readable source: [https://ai-apidocs.noflex.work/ms/api-examples](https://ai-apidocs.noflex.work/ms/api-examples)
# Permintaan Teks & Kod
Contoh ini menggunakan endpoint Serasi OpenAI Flex247.
## Sembang asas
```bash
curl https://api.noflex.work/v1/chat/completions \
-H "Authorization: Bearer sk-your-flex247-key" \
-H "Content-Type: application/json" \
-d '{
"model": "your-model-id",
"messages": [{"role":"user","content":"Write one product tagline."}]
}'
```
## Arahan sistem
```json
{
"model": "your-model-id",
"messages": [
{"role": "system", "content": "Act as a senior code reviewer. State risks first, then propose the smallest safe change."},
{"role": "user", "content": "Review the following function."}
]
}
```
## Sembang berbilang giliran
Sertakan sejarah yang perlu dikekalkan:
```js
const messages = [
{ role: 'user', content: 'Suggest three project names.' },
{ role: 'assistant', content: 'Nova, Orbit, Canvas' },
{ role: 'user', content: 'Choose the second and write a tagline.' }
]
const result = await client.chat.completions.create({
model: 'your-model-id',
messages
})
```
## Output JSON
Bagi model yang menyokong output berstruktur, minta JSON dan tetap sahkan skema dalam produksi:
```json
{
"model": "your-model-id",
"messages": [
{"role":"user","content":"Return JSON with title, summary and tags."}
],
"response_format": {"type":"json_object"}
}
```
## Tamat masa dan percubaan semula
- Cuba semula tamat masa, sambungan terputus dan ralat `5xx` tertentu dalam jumlah terhad.
- Jangan cuba `401` berulang kali; semak kunci dahulu.
- Gunakan exponential backoff untuk `429` dan kurangkan concurrency.
- Gunakan penstriman untuk tugas panjang apabila disokong.
---
## Document: Akaun & Kunci API
Source: https://ai-apidocs.noflex.work/ms/api-keys
> Human-readable source: [https://ai-apidocs.noflex.work/ms/api-keys](https://ai-apidocs.noflex.work/ms/api-keys)
# Akaun & Kunci API
Kunci API mewakili akses kepada akaun anda. Berikan setiap aplikasi kunci tersendiri supaya pemantauan, penukaran dan penyelesaian insiden lebih mudah.
## Cipta kunci
1. [Log masuk ke Flex247](https://noflex.work/sign-in).
2. Buka **Kunci API**.
3. Gunakan nama yang jelas seperti `MacBook-Codex` atau `Production-Store`.
4. Tetapkan kumpulan, had model dan kuota jika diperlukan.
5. Cipta kunci dan simpan nilai penuh dengan segera.
## Pengepala pengesahan
Permintaan Serasi OpenAI menggunakan Bearer token:
```http
Authorization: Bearer sk-your-flex247-key
```
Permintaan Protokol Anthropic boleh menggunakan:
```http
x-api-key: sk-your-flex247-key
```
## Amalan yang disyorkan
- Gunakan kunci berbeza untuk pembangunan, ujian dan produksi.
- Jangan tanam kunci dalam kod pelayar, aplikasi mudah alih atau repositori awam.
- Muatkan kunci melalui pemboleh ubah persekitaran atau pengurus rahsia sebelah pelayan.
- Nyahaktifkan kunci yang mencurigakan sebelum mencipta pengganti.
- Semak **Log Penggunaan** untuk mengesahkan model, token dan caj.
## Tukar kunci tanpa gangguan
1. Cipta kunci pengganti.
2. Kemas kini aplikasi.
3. Hantar permintaan ujian dan semak log.
4. Nyahaktifkan kunci lama selepas trafiknya berhenti.
## Pasukan dan peranti
Elakkan berkongsi satu kunci antara individu atau perkhidmatan. Kunci khusus pengguna dan perkhidmatan memudahkan pengesanan pemilik.
---
## Document: IDE & Klien Sembang
Source: https://ai-apidocs.noflex.work/ms/apps-and-ides
> Human-readable source: [https://ai-apidocs.noflex.work/ms/apps-and-ides](https://ai-apidocs.noflex.work/ms/apps-and-ides)
# IDE & Klien Sembang
Kebanyakan klien yang menyokong penyedia tersuai boleh menggunakan parameter Flex247 yang sama.
## Templat umum Serasi OpenAI
| Medan | Nilai |
| --- | --- |
| Provider / Type | OpenAI Compatible / Custom OpenAI |
| API Key | `sk-your-flex247-key` |
| Base URL | `https://api.noflex.work/v1` |
| Model | ID model tepat daripada Dataran Model |
Corak ini boleh digunakan dengan penyedia gaya OpenAI tersuai dalam klien seperti Cline, Roo Code, Kilo Code dan Cherry Studio.
## Templat umum Protokol Anthropic
| Medan | Nilai |
| --- | --- |
| Provider / Type | Anthropic / Custom Anthropic |
| API Key | `sk-your-flex247-key` |
| Base URL | `https://api.noflex.work` |
| Model | ID model yang serasi Anthropic |
## Aliran konfigurasi
1. Buka tetapan Provider, Models atau API klien.
2. Pilih penyedia tersuai.
3. Masukkan Base URL mengikut protokol.
4. Tampal kunci API Flex247.
5. Masukkan ID model atau segarkan senarai model.
6. Simpan dan hantar mesej ujian ringkas.
## Punca kegagalan biasa
- `/v1` tiada atau berulang.
- ID model tidak sepadan dengan Dataran Model.
- Kumpulan kunci tidak mempunyai saluran untuk model tersebut.
- Klien terkunci kepada satu protokol tetapi jenis penyedia yang lain dipilih.
- Konfigurasi lama dicache dan klien perlu dimulakan semula sepenuhnya.
---
## Document: Claude Code
Source: https://ai-apidocs.noflex.work/ms/claude-code
> Human-readable source: [https://ai-apidocs.noflex.work/ms/claude-code](https://ai-apidocs.noflex.work/ms/claude-code)
# Claude Code
Sambungkan Claude Code kepada Flex247 melalui pemboleh ubah persekitaran yang serasi Anthropic.
## 1. Pasang
### Windows PowerShell
```powershell
irm https://claude.ai/install.ps1 | iex
```
### macOS / Linux
```bash
curl -fsSL https://claude.ai/install.sh | bash
```
Sahkan pemasangan:
```bash
claude --version
claude doctor
```
## 2. Konfigurasi sementara
### Windows PowerShell
```powershell
$env:ANTHROPIC_AUTH_TOKEN = "sk-your-flex247-key"
$env:ANTHROPIC_BASE_URL = "https://api.noflex.work"
$env:CLAUDE_CODE_DISABLE_NONESSENTIAL_TRAFFIC = "1"
claude
```
### macOS / Linux
```bash
export ANTHROPIC_AUTH_TOKEN="sk-your-flex247-key"
export ANTHROPIC_BASE_URL="https://api.noflex.work"
export CLAUDE_CODE_DISABLE_NONESSENTIAL_TRAFFIC="1"
claude
```
## 3. Tetapan kekal
Tambah pada tetapan pengguna Claude Code:
```json
{
"env": {
"ANTHROPIC_AUTH_TOKEN": "sk-your-flex247-key",
"ANTHROPIC_BASE_URL": "https://api.noflex.work",
"CLAUDE_CODE_DISABLE_NONESSENTIAL_TRAFFIC": "1"
}
}
```
Tutup dan buka semula terminal atau editor selepas menyimpan.
## 4. Sahkan
Jalankan `claude`, minta ia membalas hanya `Flex247 connected`, kemudian semak permintaan dalam **Log Penggunaan** Flex247.
## Sambungan VS Code dan Cursor
Sambungan menggunakan pemboleh ubah yang sama. Jika CLI berfungsi tetapi sambungan gagal, keluar sepenuhnya daripada editor, buka semula dan sahkan persekitaran pengguna yang dibaca.
::: warning Keselamatan kebenaran
Jangan aktifkan pintasan semua pengesahan secara lalai. Ubah mod kebenaran hanya untuk projek dipercayai atau persekitaran terpencil.
:::
---
## Document: Codex
Source: https://ai-apidocs.noflex.work/ms/codex
> Human-readable source: [https://ai-apidocs.noflex.work/ms/codex](https://ai-apidocs.noflex.work/ms/codex)
# Codex
Penyedia tersuai Codex menggunakan Responses API. Pilih model Flex247 yang menyokong `/v1/responses`.
## 1. Tetapkan kunci API
### Windows PowerShell
```powershell
$env:FLEX247_API_KEY = "sk-your-flex247-key"
```
### macOS / Linux
```bash
export FLEX247_API_KEY="sk-your-flex247-key"
```
## 2. Edit `config.toml`
Konfigurasi peringkat pengguna disimpan di:
- Windows: `%USERPROFILE%\.codex\config.toml`
- macOS / Linux: `~/.codex/config.toml`
Tambah:
```toml
model = "your-responses-model-id"
model_provider = "flex247"
model_reasoning_effort = "medium"
[model_providers.flex247]
name = "Flex247"
base_url = "https://api.noflex.work/v1"
env_key = "FLEX247_API_KEY"
wire_api = "responses"
```
::: tip Keperluan model
Penyedia tersuai Codex menggunakan `responses` sebagai wire API. Pilih model yang menyokong Responses daripada Dataran Model.
:::
## 3. Mula dan sahkan
Jalankan `codex` dari direktori projek ujian. Minta Codex menyenaraikan fail semasa tanpa mengubahnya, kemudian semak permintaan dalam **Log Penggunaan** Flex247.
## Penyelesaian masalah
### Pemboleh ubah persekitaran tiada
Tetapkan `FLEX247_API_KEY` dalam terminal yang sama yang digunakan untuk menjalankan Codex.
### Ralat 404 atau Responses
Sahkan `base_url = "https://api.noflex.work/v1"` dan pilih model yang menyokong Responses.
### Konfigurasi tidak digunakan
Tetapan penyedia, pengesahan dan Base URL hendaklah berada dalam `config.toml` peringkat pengguna, bukan hanya `.codex/config.toml` projek.
---
## Document: Sertai Komuniti Flex247
Source: https://ai-apidocs.noflex.work/ms/community
> Human-readable source: [https://ai-apidocs.noflex.work/ms/community](https://ai-apidocs.noflex.work/ms/community)
# Sertai Komuniti Flex247
Dapatkan bantuan integrasi, kongsi aliran kerja dan belajar bersama pengguna Flex247 yang lain.
Komuniti Flex247https://community.noflex.work
[Sertai komuniti](https://community.noflex.work)
## Sebelum meminta bantuan
Sertakan:
- Nama klien atau SDK
- Sistem operasi dan versi klien
- ID model
- Base URL tanpa sebarang kunci
- Status HTTP dan mesej ralat
- Anggaran masa serta log penggunaan yang sepadan
::: danger Jangan kongsi rahsia
Sembunyikan kunci API penuh, kod penebusan, butiran akaun dan kelayakan pelayan sebelum menyiarkan tangkap layar.
:::
---
## Document: Soalan Lazim
Source: https://ai-apidocs.noflex.work/ms/faq
> Human-readable source: [https://ai-apidocs.noflex.work/ms/faq](https://ai-apidocs.noflex.work/ms/faq)
# Soalan Lazim
## 401: Pengesahan gagal
Pastikan kunci lengkap, tiada ruang tambahan dan dihantar dengan pengepala yang betul:
```http
Authorization: Bearer sk-your-flex247-key
```
Nyahaktif dan ganti kunci yang pernah didedahkan secara awam.
## 404 / 405: Laluan atau protokol salah
- OpenAI Chat: `https://api.noflex.work/v1/chat/completions`
- Responses: `https://api.noflex.work/v1/responses`
- Anthropic Messages: `https://api.noflex.work/v1/messages`
## 429: Terlalu banyak permintaan
Kurangkan concurrency dan gunakan exponential backoff. Jika halaman pentadbir turut memaparkan 429, tunggu sebentar dan semak had per-IP pada proksi atau firewall.
## Tiada saluran tersedia
Semak kumpulan kunci API, had model, baki akaun dan ID model yang tepat, kemudian cuba semula.
## Tiada output untuk tempoh lama
Semak **Log Penggunaan** untuk memastikan permintaan telah sampai. Tugas penaakulan panjang dan multimodal mungkin mengambil masa lebih lama; gunakan penstriman apabila tersedia.
## CLI berfungsi tetapi sambungan IDE gagal
IDE mungkin menyimpan pemboleh ubah persekitaran lama. Keluar sepenuhnya, buka semula dan semak Base URL, kunci serta ID model.
## Bagaimana mengesahkan caj?
Gunakan **Log Penggunaan** untuk menyemak model, input, cache, output dan caj akhir. Harga model semasa dipaparkan dalam [Dataran Model](https://noflex.work/pricing).
## Masih memerlukan bantuan
Lawati [Komuniti Flex247](https://community.noflex.work) dengan masa kejadian, ID model, kod status dan tangkap layar yang telah menyembunyikan rahsia. Jangan siarkan kunci API penuh.
---
## Document: Panduan Mula Pantas
Source: https://ai-apidocs.noflex.work/ms/getting-started
> Human-readable source: [https://ai-apidocs.noflex.work/ms/getting-started](https://ai-apidocs.noflex.work/ms/getting-started)
# Panduan Mula Pantas
Cipta akaun, jana kunci API dan hantar permintaan Flex247 pertama anda.
## 1. Cipta akaun
[Daftar akaun Flex247](https://noflex.work/sign-up), atau [log masuk](https://noflex.work/sign-in) jika anda sudah mempunyai akaun.
## 2. Jana kunci API
Selepas log masuk, buka **Kunci API** dan cipta kunci baharu. Gunakan kunci berasingan untuk peranti dan aplikasi yang berbeza supaya penggunaan dan pembatalan lebih mudah diurus.
::: warning Simpan dengan selamat
Kunci penuh biasanya dipaparkan sekali sahaja. Jangan dedahkannya dalam tangkap layar, mesej sembang atau repositori awam.
:::
## 3. Pilih model
Salin ID model semasa daripada [Dataran Model](https://noflex.work/pricing). Nilai tersebut mesti sepadan sepenuhnya.
## 4. Hantar permintaan pertama
Gantikan kunci dan ID model contoh:
```bash
curl https://api.noflex.work/v1/chat/completions \
-H "Authorization: Bearer sk-your-flex247-key" \
-H "Content-Type: application/json" \
-d '{
"model": "your-model-id",
"messages": [
{"role": "user", "content": "Reply only: Flex247 connected"}
]
}'
```
Jika respons model diterima, endpoint, kunci dan model telah dikonfigurasi dengan betul.
## 5. Gunakan pemboleh ubah persekitaran
### Windows PowerShell
```powershell
$env:FLEX247_API_KEY = "sk-your-flex247-key"
$env:FLEX247_BASE_URL = "https://api.noflex.work/v1"
```
### macOS / Linux
```bash
export FLEX247_API_KEY="sk-your-flex247-key"
export FLEX247_BASE_URL="https://api.noflex.work/v1"
```
## Langkah seterusnya
- SDK gaya OpenAI: [Serasi OpenAI](./openai-compatible)
- Anthropic Messages: [Protokol Anthropic](./anthropic-compatible)
- Agent pengekodan: [Claude Code](./claude-code), [Codex](./codex) atau [OpenCode](./opencode)
---
## Document: Dokumentasi API Flex247
Source: https://ai-apidocs.noflex.work/ms/
> Human-readable source: [https://ai-apidocs.noflex.work/ms/](https://ai-apidocs.noflex.work/ms/)
# Dokumentasi API Flex247
Flex247 provides OpenAI-compatible and Anthropic-compatible access to multiple AI model ecosystems through one API gateway.
- Human documentation: https://ai-apidocs.noflex.work/ms
- API base URL: https://api.noflex.work/v1
- Community: https://community.noflex.work
- Machine-readable index: https://ai-apidocs.noflex.work/llms.txt
---
## Document: Imej & Video
Source: https://ai-apidocs.noflex.work/ms/media
> Human-readable source: [https://ai-apidocs.noflex.work/ms/media](https://ai-apidocs.noflex.work/ms/media)
# Imej & Video
Parameter multimodal berbeza mengikut model. Semak [Dataran Model](https://noflex.work/pricing) untuk keupayaan, unit caj dan saiz yang disokong.
## Penjanaan imej
```bash
curl https://api.noflex.work/v1/images/generations \
-H "Authorization: Bearer sk-your-flex247-key" \
-H "Content-Type: application/json" \
-d '{
"model": "your-image-model-id",
"prompt": "A clean product hero image, soft studio lighting",
"size": "1024x1024",
"n": 1
}'
```
Respons mungkin mengandungi URL imej atau data Base64. Baca medan respons dan jangan anggap semua model menggunakan format yang sama.
## Penjanaan video
Video lazimnya tak segerak: hantar tugas, simpan ID tugas, semak status dan muat turun hasil selepas selesai.
```bash
curl https://api.noflex.work/v1/videos \
-H "Authorization: Bearer sk-your-flex247-key" \
-H "Content-Type: application/json" \
-d '{
"model": "your-video-model-id",
"prompt": "A cinematic product reveal with slow camera movement"
}'
```
::: warning Perbezaan mengikut model
Laluan dan medan untuk tempoh, nisbah aspek, bingkai awal atau akhir serta status tugas mungkin berbeza. Ikut keperluan khusus model yang dipaparkan oleh Flex247.
:::
## Cadangan produksi
- Gunakan kunci dan kuota khusus untuk imej dan video.
- Simpan ID tugas bagi mengelakkan penghantaran dan caj berganda selepas gangguan rangkaian.
- Sahkan prompt pengguna dan saiz input.
- Salin aset siap ke storan objek sendiri dan jangan bergantung pada URL sementara.
---
## Document: Model & Endpoint
Source: https://ai-apidocs.noflex.work/ms/models-and-endpoints
> Human-readable source: [https://ai-apidocs.noflex.work/ms/models-and-endpoints](https://ai-apidocs.noflex.work/ms/models-and-endpoints)
# Model & Endpoint
Flex247 menyokong dua corak API biasa. Pilih corak yang diperlukan oleh SDK atau klien anda.
Serasi OpenAIhttps://api.noflex.work/v1
Protokol Anthropichttps://api.noflex.work
## Laluan biasa
| Kegunaan | Kaedah | Laluan |
| --- | --- | --- |
| Chat Completions | `POST` | `/v1/chat/completions` |
| Responses | `POST` | `/v1/responses` |
| Anthropic Messages | `POST` | `/v1/messages` |
| Senarai model | `GET` | `/v1/models` |
| Penjanaan imej | `POST` | `/v1/images/generations` |
::: tip Perlukah Base URL mengandungi `/v1`?
SDK gaya OpenAI biasanya menggunakan `https://api.noflex.work/v1`. Klien Anthropic seperti Claude Code biasanya menggunakan `https://api.noflex.work` dan menambah `/v1/messages` secara automatik.
:::
## ID model
Salin ID model semasa daripada [Dataran Model](https://noflex.work/pricing). Jangan meneka ID atau menambah ruang dan akhiran versi.
```json
{
"model": "your-model-id"
}
```
## Pilih protokol
- Klien yang meminta `base_url`, `api_key` atau Chat Completions biasanya memerlukan Serasi OpenAI.
- Klien yang meminta `ANTHROPIC_BASE_URL`, `ANTHROPIC_AUTH_TOKEN` atau Messages memerlukan Protokol Anthropic.
- Penyedia tersuai Codex memerlukan model yang menyokong Responses dan `/v1/responses`.
## Kumpulan dan had model
Untuk ralat “tiada saluran tersedia” atau “model tidak tersedia”, semak kumpulan kunci API, had model dan baki akaun sebelum mencuba semula.
---
## Document: Serasi OpenAI
Source: https://ai-apidocs.noflex.work/ms/openai-compatible
> Human-readable source: [https://ai-apidocs.noflex.work/ms/openai-compatible](https://ai-apidocs.noflex.work/ms/openai-compatible)
# Serasi OpenAI
Gunakan protokol ini dengan SDK gaya OpenAI, Chat Completions dan model Responses yang disokong.
Base URLhttps://api.noflex.work/v1
## cURL
```bash
curl https://api.noflex.work/v1/chat/completions \
-H "Authorization: Bearer sk-your-flex247-key" \
-H "Content-Type: application/json" \
-d '{
"model": "your-model-id",
"messages": [
{"role": "system", "content": "You are a concise assistant."},
{"role": "user", "content": "Give me three product name ideas."}
]
}'
```
## JavaScript / TypeScript
```bash
npm install openai
```
```js
import OpenAI from 'openai'
const client = new OpenAI({
apiKey: process.env.FLEX247_API_KEY,
baseURL: 'https://api.noflex.work/v1'
})
const result = await client.chat.completions.create({
model: 'your-model-id',
messages: [{ role: 'user', content: 'Explain this function.' }]
})
console.log(result.choices[0].message.content)
```
## Python
```bash
pip install openai
```
```python
import os
from openai import OpenAI
client = OpenAI(
api_key=os.environ["FLEX247_API_KEY"],
base_url="https://api.noflex.work/v1",
)
result = client.chat.completions.create(
model="your-model-id",
messages=[{"role": "user", "content": "Write a short launch checklist."}],
)
print(result.choices[0].message.content)
```
## Output penstriman
```js
const stream = await client.chat.completions.create({
model: 'your-model-id',
messages: [{ role: 'user', content: 'Write a short story.' }],
stream: true
})
for await (const chunk of stream) {
process.stdout.write(chunk.choices[0]?.delta?.content ?? '')
}
```
## Responses API
Gunakan `/v1/responses` hanya dengan model yang menyokong Responses:
```bash
curl https://api.noflex.work/v1/responses \
-H "Authorization: Bearer sk-your-flex247-key" \
-H "Content-Type: application/json" \
-d '{"model":"your-responses-model-id","input":"Return only OK"}'
```
---
## Document: OpenCode
Source: https://ai-apidocs.noflex.work/ms/opencode
> Human-readable source: [https://ai-apidocs.noflex.work/ms/opencode](https://ai-apidocs.noflex.work/ms/opencode)
# OpenCode
Konfigurasikan Flex247 dalam `opencode.json`. Pilih satu definisi penyedia mengikut protokol model.
## 1. Pasang dan sahkan
```bash
npm install -g opencode-ai
opencode --version
```
## 2. Konfigurasi Serasi OpenAI
Cipta `opencode.json` dalam direktori projek:
```json
{
"$schema": "https://opencode.ai/config.json",
"provider": {
"flex247": {
"npm": "@ai-sdk/openai-compatible",
"name": "Flex247",
"options": { "baseURL": "https://api.noflex.work/v1" },
"models": {
"your-model-id": { "name": "your-model-id" }
}
}
},
"model": "flex247/your-model-id"
}
```
## 3. Konfigurasi Protokol Anthropic
```json
{
"$schema": "https://opencode.ai/config.json",
"provider": {
"flex247": {
"npm": "@ai-sdk/anthropic",
"name": "Flex247",
"options": { "baseURL": "https://api.noflex.work" },
"models": {
"your-claude-model-id": { "name": "your-claude-model-id" }
}
}
},
"model": "flex247/your-claude-model-id"
}
```
## 4. Simpan kunci
```bash
opencode providers login --provider flex247
```
Tampal kunci API Flex247 apabila diminta.
## 5. Uji
Jalankan `opencode` dalam direktori ujian. Mulakan dengan tugas baca sahaja dan sahkan sambungan serta kebenaran sebelum menggunakan projek produksi.